.................................. Return to Sumner's Home Page....
Return to N Scale RR Main Menu........ Return to Servo Control Menu
=========================================
..............Previous Page..............................Next Page If There Is One
=========================================
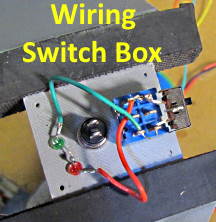
…..........--- Turnout Switch Box and Wiring It ---
=========================================
Since a servo can't be connected directly to a switch we need two basic items to control it.
First is the servo controller that is connected to the servo and to the activating toggle switch at the control panel. The servo controller will control how far the servo arm moves in either direction when activated. It will be discussed and the simple wiring required for it will be in the next section.
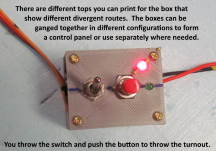
The second item we need is a way to tell the servo controller when to move the servo. To do this a toggle switch is used to activate the servo controller which will then throw the servo one way or the other. We will also add a push button switch. You push it for a couple seconds after throwing the toggle switch. By using it the servo and the servo controller are only using power while the servo arm is moving. This is good for two reasons. One is it is good for the servo and second it reduces the demand on the 5 volt power-supply. There are also 2 LED's (not required) that will indicate which route has been selected. They will receive power at all times but very little.
The following menu will be direct links to the items described:
1 -- The 3D printed turnout switch box and the different top options …...............................................
3 – How to wire the switch box and how to use it …................................................................................
3 – Turnout Switch Box Option to Reverse Servo Throw ….............................................................
=========================================
...........................On..............e.........Next Page --- Servo Controller