.................................. Return to Sumner's Home Page....
Return to N Scale RR Main Menu............. Return to Trackwork Menu
=========================================
..............Previous Page..............................Next Page If There Is One
=========================================
….................................--- 'Toggle-Switcher' ---
….--- 'Gravity-Switcher' Switch Machine Control ---
=========================================
NOTE (24-01-04): I put up print files for a newer, little better version of the 'Toggle Switcher' on thingiverse.com ( HERE ).
=========================================
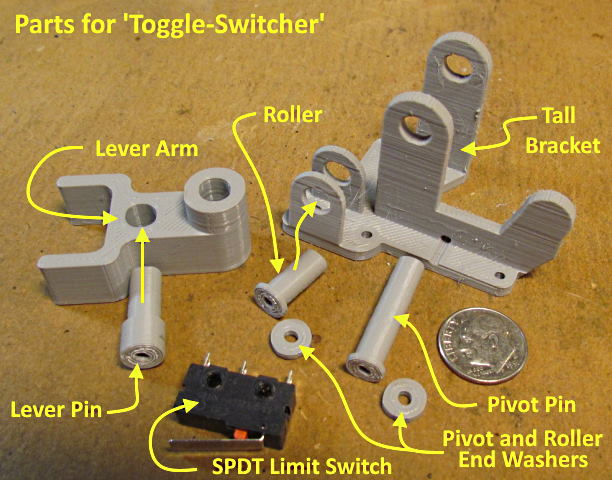
I've been using what I call the 'Toggle-Switcher' shown below to control two of my 'Gravity-Switcher' switch machines on my test layout for a couple months now and wanted to do a 'how well do they work' report on them.
First the 'Gravity-Switcher' switch machines have been very reliable in throwing the two sets of points on a 3-Way turnout I have on the test track. They reliably throw the points every time. I couldn't ask more of them and they are pretty much simplicity in design and function. If you have a printer and they would work with your turnouts I'd say give them a try. If you don't have a printer and you needed to throw and control say 10-20 turnouts printing the switch machine and the controller below or a different one would pay for a printer like the Ender 3 Pro I use vs. buying switch machines and controllers. Any other prints wouldn't cost a thing other than filament. You'd have your switch machines, controllers and a printer, can't beat that. To understand how the 'Gravity-Switcher' works go ( HERE ).
I'm 77 and in OK shape but hate working on something from below so a big plus with the Gravity-Switcher and these controllers is you aren't under the layout except to drill two holes and screw two screws in. If you already saw the page on installing the Gravity-Switcher, two pages back or ( HERE ) you will remember you drill a 1/4” hole in the layout under the turnout's throw bar. Then insert a fixture in the hole that has a template with two holes in it. You slide under the layout for a minute and drill two pilot holes using the fixture. Start two screws in the Gravity-Switch and mount it under the layout using the two pilot holes. That's it, you are done under the layout basically and you didn't need a helper to get the throwbar wire in the right place for the throwbar.
Remember that I have other options that you can print to control the 'Gravity-Switch' besides this one and you could come up with your own as the only thing you have to do to throw the switch machine and the turnout points is to lift a 3 oz. Weight about 1 inch. The weight doesn't know or care how it gets lifted and dropped. On to what I call the 'Toggle-Switcher'.
Pros:
1. You can print it for next to nothing as printer filament is very cheap.
2. It is very simple to assemble and mount on the side of the layout.
3. I like how reliable it is in working every time you use it.
4. I like that you can use it by feel and don't have to look at it to see what position it is in.
5. If you install the 'Gravity-Switcher' switch machine facing the correct way under the turnout 'Up' on the Toggle-Switch' can always throw the turnout so that it is set for the 'Main Route'. Down then would always set the turnout to the 'Divergent Route'. A quick glance or feeling it will immediately tell you which route the turnout is set for even if it is some distance from you.
6. It is very easy to setup. Run inexpensive monofilament fishing line from the 'Gravity-Switcher' switch machine through one or more eye-hooks to where the 'Toggle-Switcher' is mounted. The line comes through a 1/4” hole, over a roller and to a screw on the the lever arm on the 'Toggle-Switcher'. Pull the line until you can feel the weight at the switch machine lift. Back off a touch and wrap the line around the screw, tighten the screw and you are done. How simple is that?
7. If you want to control the polarity of the turnout's frog run a wire from the limit switch on the controller to the frog and two other wires from the limit switch to the track buss. I'm set up so none of this wiring is under the layout. I drop a wire from the frog, grab it and pull it over to the side of the layout and through a hole by the controller and to the limit switch (you will see this below).
Cons:
1. About the only one I can think of is that this doesn't look like any turnout controller you are use to looking at.
Hopefully the pictures below will tell the rest. If not ask online or at ( contact20 (at) purplesagetradingpost (dot) com ).
.
.
.
.
.
.
.
.
.
The video ( HERE ) or above should give you an idea how the 'Toggle-Switcher' and the 'Gravity-Switcher' switch machine work together to throw the turnout. There are other options to control the 'Gravity-Switcher' ( HERE ).
Above or ( HERE ) is video using the 'Toggle Switch' with the 'Spring Switcher' turnout control.
NOTE (24-01-04): I put up print files for a newer, little better version of the 'Toggle Switcher' on thingiverse.com ( HERE ).
You can find the files to print the items (older version) ( HERE ).
You can find all the files to 3D print this object and others on my thingiverse.com account ( HERE ).
=========================================
...........................On..............e.........Next Page If There Is One