..................................
Return
to Sumner's Home Page....
Return
to N Scale RR Main Menu........ Return
TrackManager Menu
=========================================
..............Previous
Page..............................Next
Page If There Is One
=========================================
........---
Editing the config and myAutomation Files
---=========================================
Next
the config and myAutomation files will be edited for the initial
testing. You can later come back and edit these files to suit your
needs. These need to be in ‘text’ file format. I use Notepad but
you may use another text editor. If you copy the files from here make
sure they end up in a ‘text’ format.
You
will find more info on these files and working with them here….
https://dcc-ex.com/ex-installer/managing-config-files.html#config-h
-----------------------------------------------------------------------------------------------------------------------------
config
file: You
can download it
(
HERE
).
// config.h - refer to config.example.h for details and other options

#define IP_PORT 2560
#define WIFI_HOSTNAME "dccex"
#define WIFI_SSID "Your network name"
#define WIFI_PASSWORD "Your network passwd"
#define WIFI_CHANNEL 1
#define ENABLE_WIFI true
#define ENABLE_ETHERNET false

#define F439_L298X4 F("F439_L298X4"), \
new MotorDriver(16, 21, UNUSED_PIN, 10, A13, 0.73, 1500, UNUSED_PIN), \
new MotorDriver(22, 23, UNUSED_PIN, 5, A6, 0.73, 1500, UNUSED_PIN), \
new MotorDriver(26, 43, UNUSED_PIN, 28, A2, 0.73, 1500, UNUSED_PIN), \
new MotorDriver(30, 44, UNUSED_PIN, 29, A8, 0.73, 1500, UNUSED_PIN), \
new MotorDriver(39, 36, UNUSED_PIN, 38, A3, 0.73, 1500, UNUSED_PIN), \
new MotorDriver(34, 35, UNUSED_PIN, 58, A4, 0.73, 1500, UNUSED_PIN), \
new MotorDriver(57, 64, UNUSED_PIN, 59, A5, 0.73, 1500, UNUSED_PIN), \
new MotorDriver(66, 65, UNUSED_PIN, 61, A14, 0.73, 1500, UNUSED_PIN)
#define MOTOR_SHIELD_TYPE F439_L298X4
Note:
You need to check the config file above before using it.
The
config file show above might not match the way your PCB is setup.
Also if you are using a DCC-EX motor shield third and second to last
columns will need to be change for that board. This isn’t hard and
the following images should let you know what to do. Again be sure
it is saved in text format.

In
the lower right corner of the PCB you can find a table with how the
pins are assigned for the software to work with your board (there
might be revisions since this was posted).
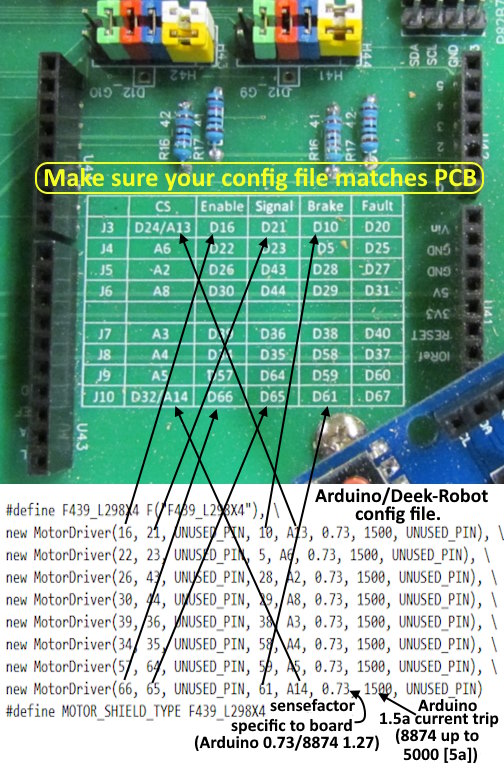
Using
a copy of your config file check the pin numbers in the config file
against the numbers in the table. If needed change the config file
to match the table.
Also
the column for the ‘sensefactor’ will be different if you are
using an Arduino or Deek-Robot motor shield or the DCC-EX 8874 motor
shield. For the first two the column should be like shown with the
number 0.73 in all of the rows. If you are using the 8874 put 1.27
in all of the rows.
The
row for the ‘current trip’ number should be 1500 or less
(recommended) for the Arduino or Deek-Robot motor shields. For the
8874 you can have up to 5000 (5 amps) as the current trip level. If
you are running say N gauge then personally I’d keep it under 2000
(2 amps) as you don’t need 5 amps. For HO or O use what you feel
comfortable with.
If
you had to make any changes to the config file save it in text
format.
-------------------------------------------------------------------------------
myAutomation
file: You
can download it
(
HERE
).
// myAutomation.h - Generated by EX-Installer v0.0.21 for EX-CommandStation v5.4.6-Prod

AUTOSTART
ROUTE(247, "DCC mode 7+1 tracks")
  SET_TRACK(A, MAIN)
  SET_TRACK(B, MAIN)
  SET_TRACK(C, MAIN)
  SET_TRACK(D, MAIN)
  SET_TRACK(E, MAIN)
  SET_TRACK(F, MAIN)
  SET_TRACK(G, MAIN)
  SET_TRACK(H, PROG)
  SCREEN(0,1, "DCC 7+1")
DONE
NOTE:
You
can add other ‘ROUTE’s later to use to set the tracks to any
track mode you want and to assign a loco number to them also.
I
have a separate page on using ‘ROUTE’s to change the tracks at
any time with your throttle between DCC, DC, PROG, etc. (
HERE ).
After you run the installer again as shown below when the command
station starts tracks A-G will be DCC MAIN as shown in the
myAutomation file and track H will be set as PROG (a programming
track).
----------------------------------------------------------------------------------------
RE-RUN
INSTALLER:
To
update the original config and myAutomation files that were created
previously re-run the installer and when you get to the pages below
follow the instructions shown on them.
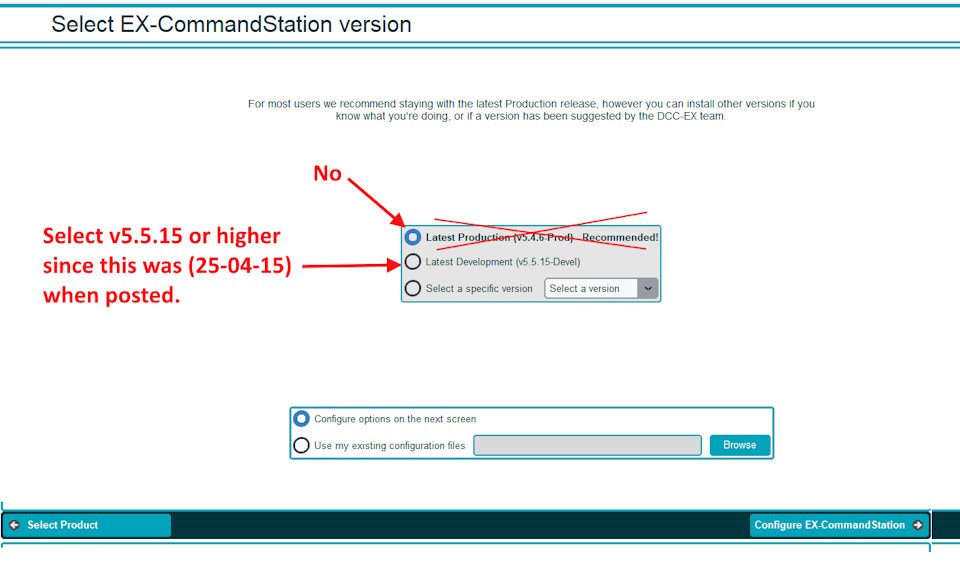
Note:
At the time this was posted (25-04-15) the production version
(v5.4.6) wasn’t working with the Nucleo install. V5.5.15 was
working. The production version will change over time. Make sure
you are using v5.5.15 or newer.
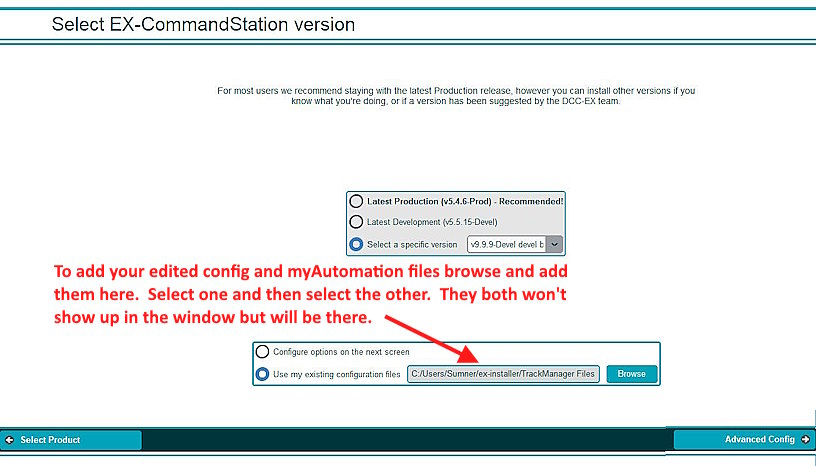
Above
you will select ‘Use my existing configuration files’. Browse to
the folder where you have them. Select config.h and your
myAutomation file will be automatically added. You will see it on
the next screen.
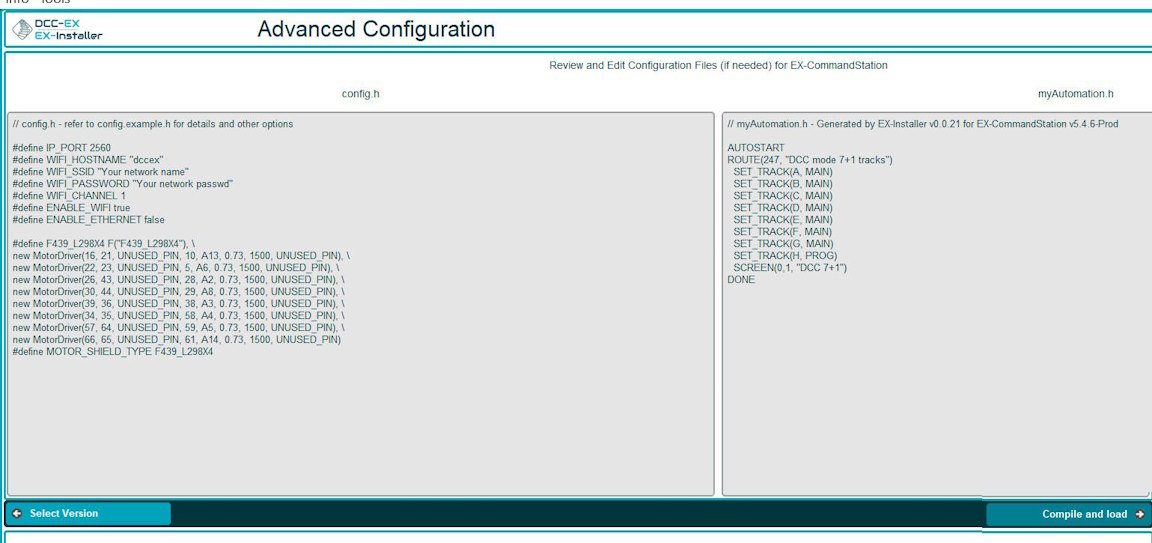
What
you see above should be what is in the latest version of those files
that you have saved.
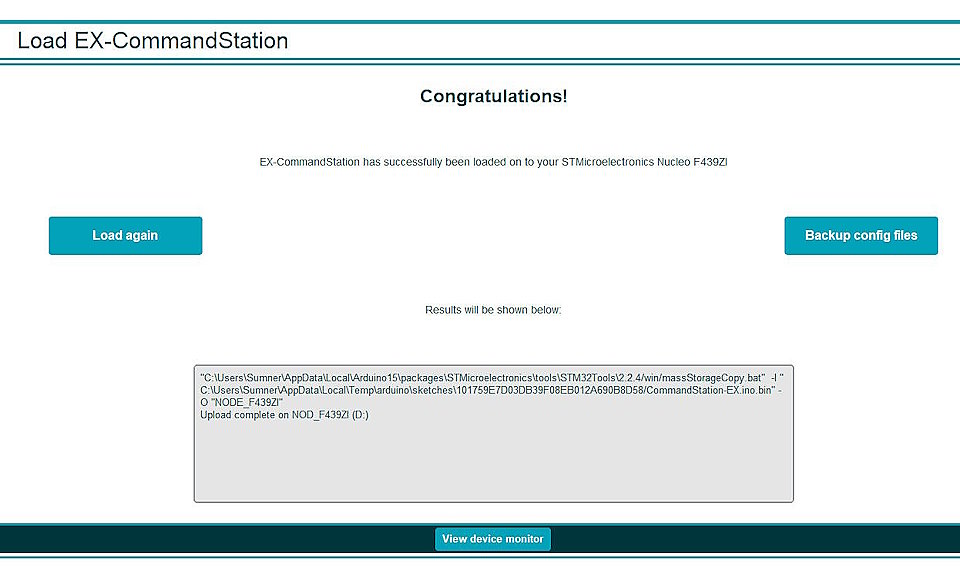
Check
for a successful install like you did on the bottom
of the previous page.
You
are now ready to enjoy TrackManager on your DCC-EX Command Station.
=========================================
...........................On..............e.........Next
Page If There Is One