.................................. Return to Sumner's Home Page....
Return To Suzuki 650 Main Menu.... Return To Accessories Menu
========================================
..............Previous Page..............................Next Page If There Is One
========================================
..........--- Soupy's Lowering Links ---
I'm a touch over 6' with a 34" inseam. I'm also 73 and don't have a whole lot of leg strength anymore. I can easily touch the ground with the bike's stock height. Right after buying the bike we put about 1500 miles on it in two trips. If I only rode solo I probably wouldn't of lowered the bike at all, but with the bike loaded for a trip I just felt a little uncomfortable coming to a stop and at a stop at times, with so much weight high on the bike. At times I felt like I might possibly drop it.
My wife and I are about 320 together and with the large side cases and large top case there is a lot of weight up high. My goal was to lower it enough so that I could splay my feet a little further apart while stopped for added stability. I think I have that now, with the bike lowered about 3/4 of an inch, in the back only.
Soupy's lowering links are adjustable and I could of gone more, most don't recommend more than 1 1/8th inches though. I haven't lowered the front at this point and like the way the bike still handles and how it sits on the stock side stand so will ride in this configuration for a while or maybe permanently.
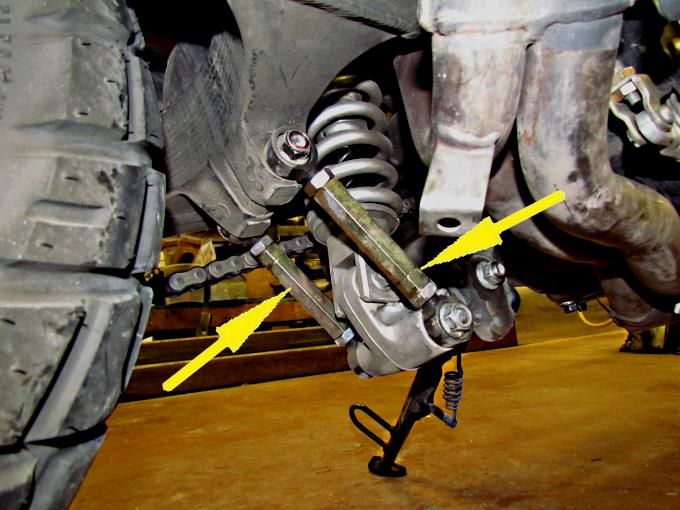
Above you see Soupy's links installed on the bike. You can find the links on the internet ( HERE ) and there is an installation video there and ( HERE ).
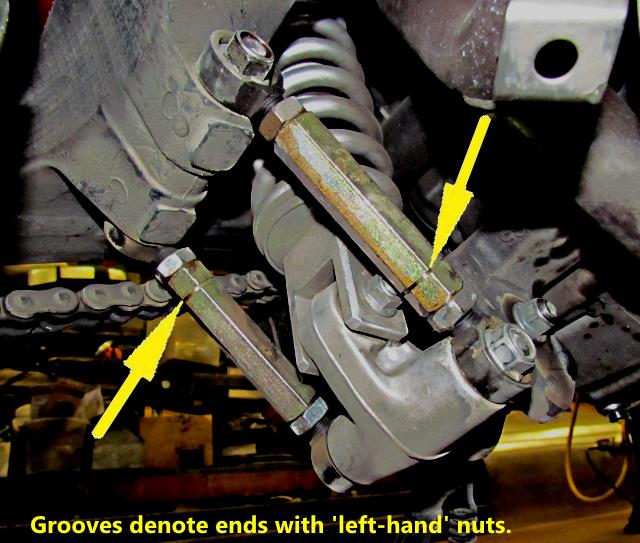
Two things to keep track of in the install is that the end of the links with the grove, arrows above, is the end with 'left-hand' jam nuts. The second thing to keep track of is that you are turning them, flat by flat, so that they are both getting shorter or longer. I screwed up and then had to go back to square one and get the same amount of threads on the ends of both of them, like they were when they came.
This is an easy installation.
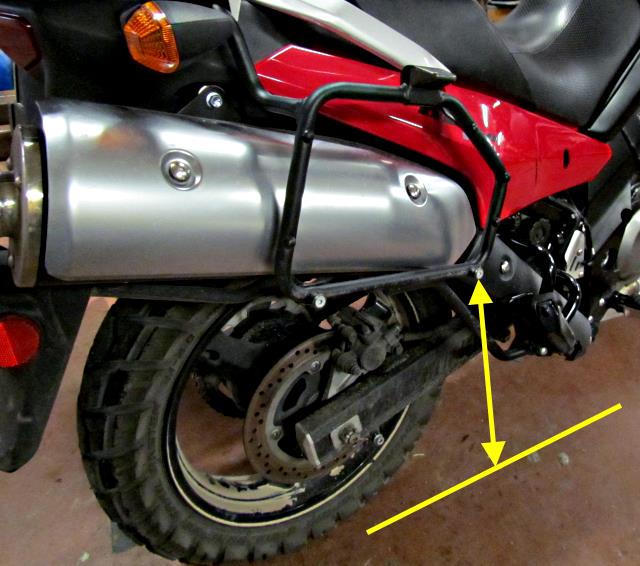
I took measurements from a point on the side case rack to the floor. I took the measurements with the bike being held upright so that the measurements were the same on both sides of the bike. Before starting I took a base measurement to see how much I lowered the bike as I adjusted the lowering links.
I decide to try a 3/4 inch drop at first and so far I'm happy with that.
In the installation video they show how, if you have a helper you can lean the bike over on the side stand and remove and install the new links. I felt the bike was too heavy for Dottie and I to try this. I did have one big advantage though.
I have a 2 post car lift in the shop. I put a square steel bar across the lift from one side to the other with the bar above the bike and the bike between the 2 posts. I then tied nylon straps from the point shown above up above the bike and onto the steel bar. I did this for both sides. Then I used the lift to lift the back of the bike off the ground and changed out the links.
With the new links on and the bike back on the floor, Dottie would hold the bike upright and I'd measure from the ground up on both sides to the side case mounts to get the bike perfectly vertical. Next I would turn both links the same number of flats and remeasure until I arrived at the bike being 3/4 inch lower than my starting base measurement..
I had considered buying non-adjustable links but I'm happy that I went with the adjustable ones. They are a quality product.
========================================
...........................................e.........Next Page If There Is One