.................................. Return to Sumner's Home Page....
Return to N Scale RR Main Menu........ Return to DCC++ Menu
=========================================
..............Return to WiTcontroller Menu..............................Next Page If There Is One
=========================================
….......................................................--- WiTcontroller Throttle ---
.............................. --- GPIO Inputs Part 1 ---
============== Important Info =====================
I have a build up for the first WiTcontroller throttle I built around Peter's original version of his WiTcontroller software ( HERE ). This build will cover the newer version of his software that now allows the external function buttons to be connected directly to the ESP32's GPIO inputs. This simplifies the wiring vs. the older throttle where the function buttons are wired in parallel to the keypad keys.
Besides being easier to wire you can now have up to 10 functions controlled by the keypad keys. Plus up to 7 additional functions assigned to the external pushbutton switches. In his software the functions are listed under 'assignments'. This is explained on his GitHub site which you will need to go to in order to download the software. The link to his GitHub site is ( HERE ).
If you are running a loco with sound you can have over 20 functions. You can now assign any of those to a keypad key or a function button and can access all of those via a menu on the throttle even though you don't have enough buttons and keys to assign to all of them. The throttle will bring up screens you can page to for the available functions if you have them assigned to the loco in your roster. You add the loco from your roster to the throttle and it will also add all those sound options which can be displayed and called upon.
================ The Build ======================
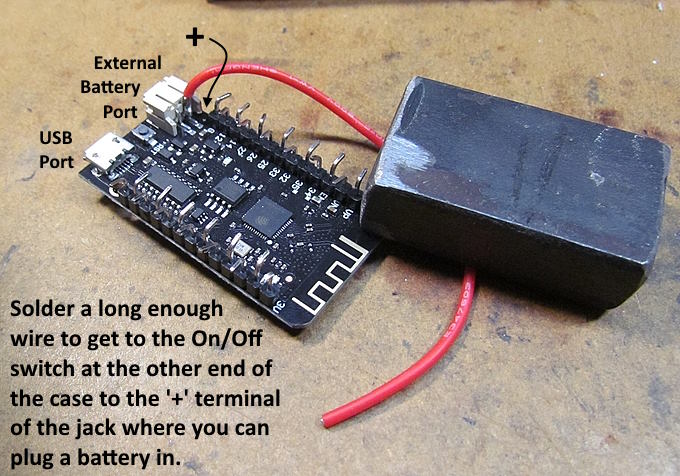
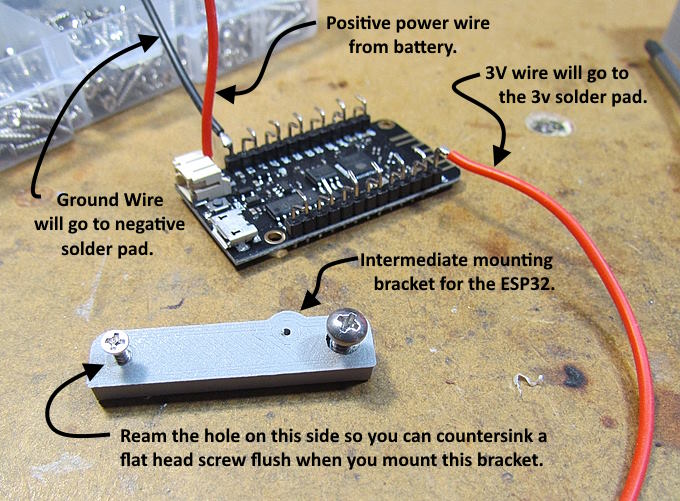
This page will cover the wiring diagram for the WiTcontroller throttle and the start of the build. One needs to follow the basic wiring diagram as shown at first below but then there are options. I had two batteries so used them but wiring for one is simpler. I added a charging port but one can charge using the ESP32's USB port. I wanted the ESP32 off during charging but it doesn't have to be. With two batteries I added a battery selector switch and a main on/off switch. I also put two screws through the case side and connected one to ground and the other to the battery selector switch. I can put my VOM on the two screws and measure the battery voltage easily so see if I want to recharge.
The main addition was I wanted additional pushbutton switches on the case for seven function pushbuttons. These function buttons can be assigned to assignments different from those for the keypad. I find it easier and quicker and more intuitive over time to use the buttons but you do not need to add them and I'll put the print files up for 'Button holes' and 'No Buttons button holes'. You could use the later to drill holes for buttons where you want them.
For my needs the two side buttons make it easy to operate the Bell or Horn with the hand holding the case. Also you can reach most of the rest of the buttons with that hand leaving the other hand free for the throttle knob or doing something else. I mounted the throttle on the side and really like it there. Hold your left hand out palm up like you would holding a throttle. Now pretend the throttle is in that hand. Is it easier and more natural to operate a throttle knob clockwise and counter-clockwise with your right hand on the side or top of the throttle you are holding? The case kick-out where the throttle is also makes the case more natural to hold I find.
The case seems to be a good size. I was going to make it thinner but glad I didn't. For me I wouldn't want if any smaller yet it is smaller than my phone throttle that has a physical throttle knob. After using it some the phone throttle isn't going to be used much except for maybe sound locos as it is easier to see all the sound function options on the screen with Peter's EngineDriver. A couple big pluses for this throttle is it runs forever without having to recharge the battery vs. the phone throttle. It is quicker to pickup, turn on, connect to the WiThrottle and run a loco than the phone throttle. Finished.....turn it off....set it down.... it is ready to go without having to plug it into be charged. Great job on the software by Peter Akers that makes the throttle possible to build. A link to his GitHub account where you can find the software and more ( HERE ).
Note the additional buttons go to GND and to a GPIO pin. Very simple and you edit the config_buttons file to assign a function/assignment to each button you add. You can change these any time by editing that file and reloading the software onto the ESP32 in a few minutes.
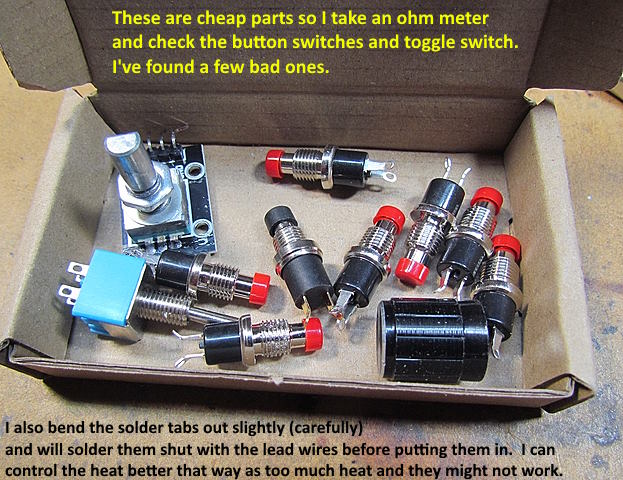
Most of us are going to use the cheap stuff we can find everywhere on the internet. Some of it is bad or will go bad. I check the button and toggle switches with an ohm meter before putting them into the throttle. Still in two throttles I've had to later replace one on/off pushbutton switch and two momentary pushbutton switches. It is easy to do but I'd still check them before using them.
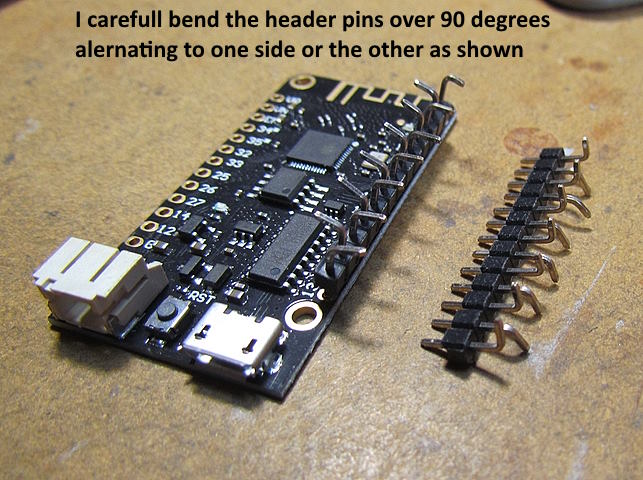
You are going to have to make building decisions that might be different than mine. I tried two different methods of connecting wires to the ESP32 header but now prefer the method shown here. I carefully bend every other head pin 180 degrees to the ones on each side of it.
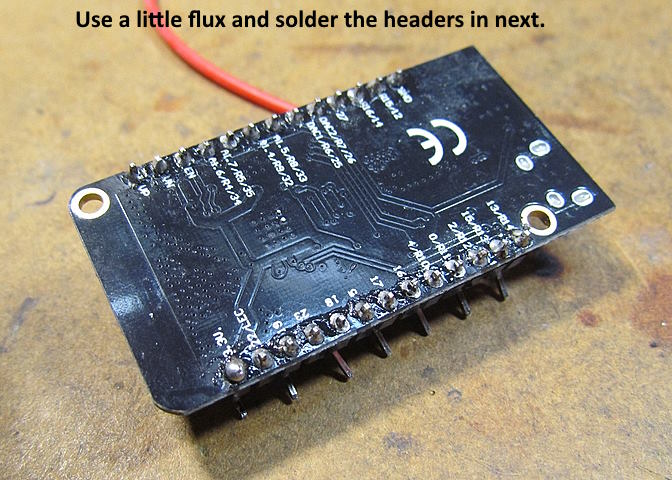
I solder them in and now would also be...
….. a good time to tin each pin with a drop of flux and solder. I did it later but would now do it at this step. This will make it very easy later to solder a wire to the bent pin.
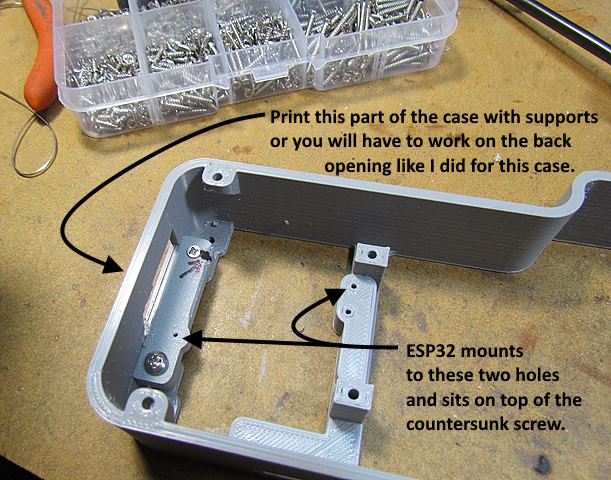
Besides the three main case parts (top, middle and bottom) you print three other parts. One to hold the keypad in place. One to hold the OLED display in place and the one above that is used to mount the ESP32. Counter sink the hole on the left so that the flathead screw will end up flush or below the surface as the ESP32 will rest on that area. (I'll try and change the print file so it prints with the recess).
The one hole that is about the middle of the image above next to the mounting hole isn't used for anything.
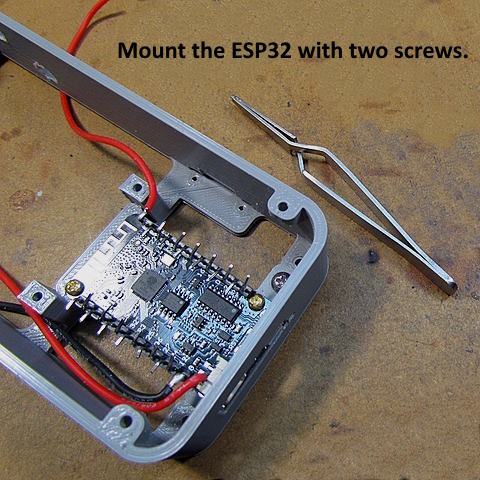
Fine screws that fit the holes. Don't use oversize or you could damage the board or split the case at the holes.
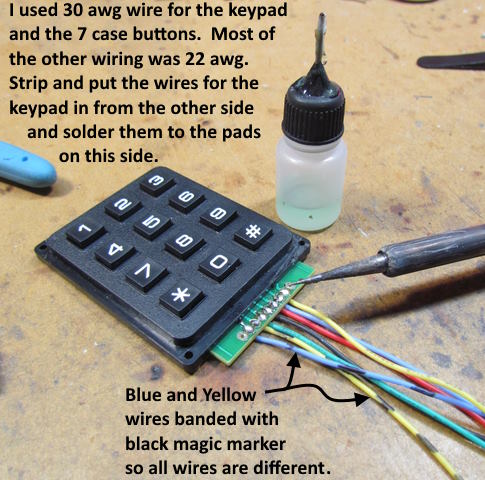
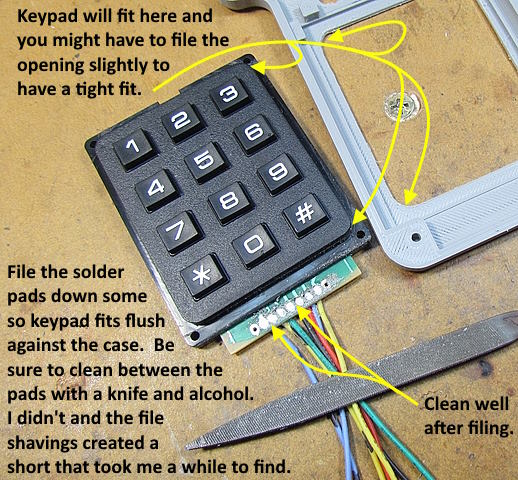
Make sure you have the wires where you can tell them apart and make a note as to which ones go to R1, R2, R3, R4 and C1, C2 & C3. Those pads are not in that order at the bottom of the keypad. Refer to the image at the top of this page. You will need to know this when you go to solder the wires to the ESP32.
You need to file those solder joints down fairly flat so that the keypad lays flat in the case. The print files up now have a little more relief where those pads are so it should take less filing. Pop the keypad in to check the clearance. Also you might have to lightly file the corners of the keypad and/or the corners of the case depending on how close your printer printed in regards to the print file. I left this a little tight for a better fit of the keypad. I spent maybe 5 minutes on one and a couple minutes on another but ended up with a really nice fit.
I had erratic behavior from the second throttle and finally after a couple hours traced it back to filing the keypad solder pads. I didn't clean that area well and the leftover flux contained enough filings from the solder and wire that it was bridging the gap on the first two pads on the left side. I'd get zero ohms between them. I cleaned it once and it worked until it didn't. Then I really cleaned the area by making sure there was absolutely no filing dust left between pads and no problems since. I probably need to go back to the first throttle and clean that area even though it has been working fine.
If you don't buy the exact same keypad I did then not sure how things are going to go for you. If you are in the States the keypad from DigiKey was only about $5 and the freight about the same so I'd recommend getting it there. I got two and the freight for like $15. I think they also have a spec sheet on it that would give the dimensions if you have to look elsewhere.
…....... continued on the next page............
=========================================
...........................On..............e.........Next Page If There Is One