.................................. Return to Sumner's Home Page....
Return to N Scale RR Main Menu........ Return to DCC++ Menu
=========================================
..............Return to WiTcontroller Menu..............................Next Page If There Is One
=========================================
….......--- Building Peter's WiTcontroller Throttle ---
.............................. --- Part 1 ---
=========================================
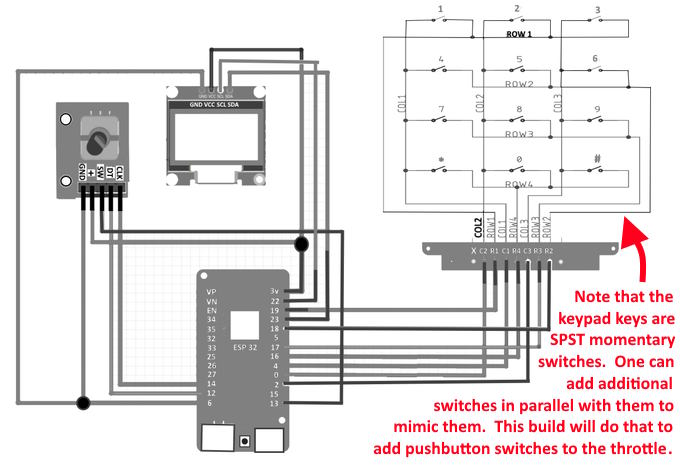
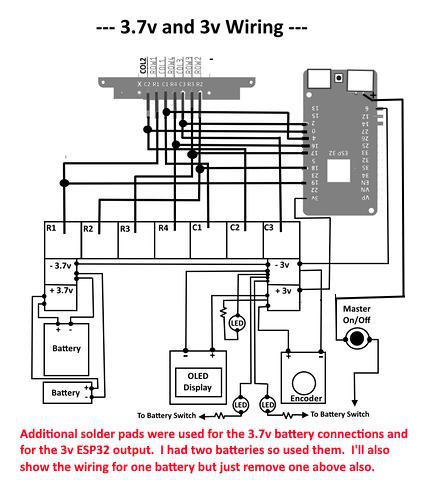
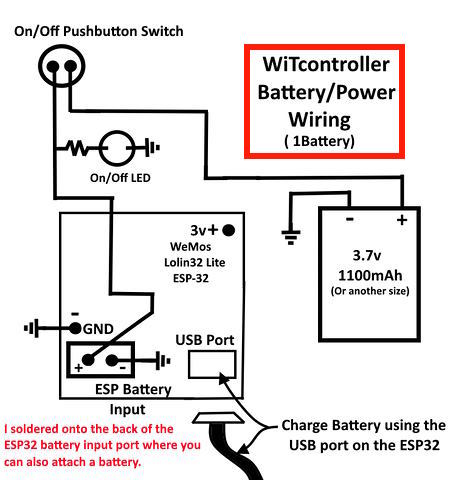
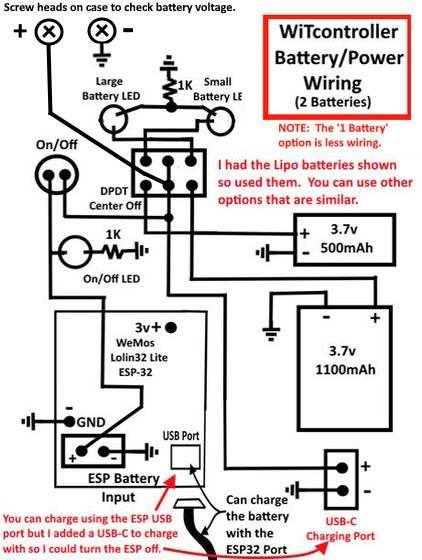
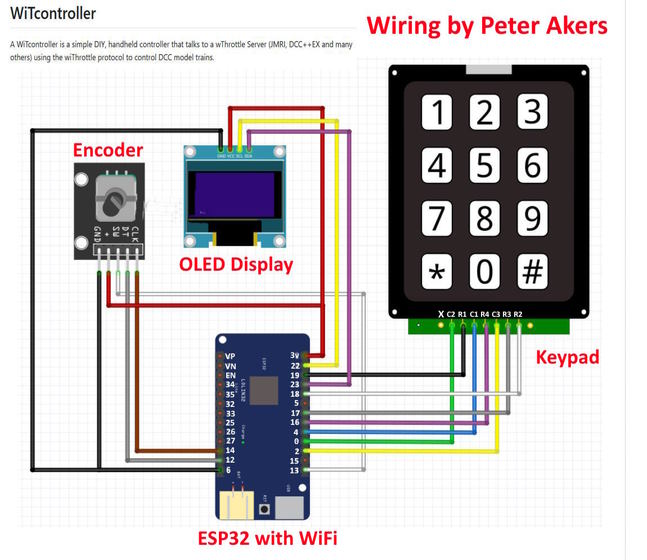
This page will cover mainly the wiring diagrams for the WiTcontroller throttle. One needs to follow the basic wiring diagram as shown at first below but then there are options. I had two batteries so used them but wiring for one is simpler. I added a charging port but one can charge using the ESP32's USB port. I wanted the ESP32 off during charging but it doesn't have to be. With two batteries I added a battery selector switch and a main on off switch. I also put two screws through the case side and connected one to ground and the other to the battery selector switch. I can put my VOM on the two screws and measure the battery voltage easily so see if I want to recharge.
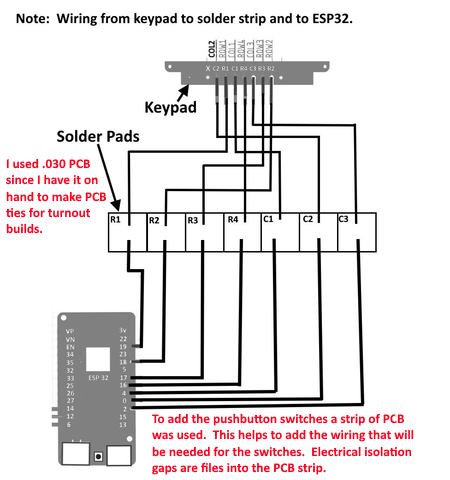
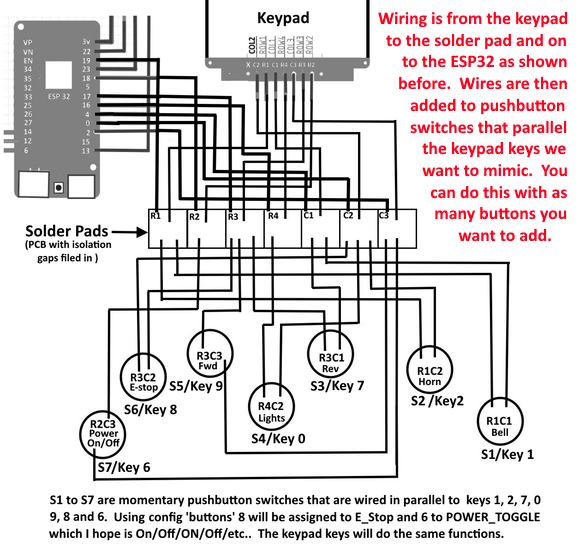
The main addition was I wanted additional pushbutton switches on the case for seven of the functions. These functions can also be selected at any time via the keyboard also. I find it easier and quicker and more intuitive over time to use the buttons but you do not need to add them and I'll put the print files up for 'Buttons' and 'No Buttons' and a option for 'Very Small Button Holes' that could later be drilled out maybe.
The two side buttons make it easy to operate the Bell or Horn with the hand holding the case. Also you can reach most of the rest of the buttons with that hand leaving the other hand free for the throttle knob or doing something else. I mounted the throttle on the side and really like it there. Hold your left hand out palm up like you would holding a throttle. Now pretend the throttle is in that hand. Is it easier and more natural to operate a throttle knob clockwise and counter-clockwise with your right hand on the side or top of the throttle you are holding? The case kick-out where the throttle is also makes the case more natural to hold I find.
The case seems to be a good size. I was going to make it thinner but glad I didn't. For me I wouldn't want if any smaller yet it is smaller than my phone throttle that has a physical throttle knob. After using it some the phone throttle isn't going to be used much except for maybe sound locos as it is easier to see all the sound function options on the screen with Peter's EngineDriver. A couple big pluses for this throttle is it runs forever without having to recharge the battery vs. the phone throttle. It is quicker to pickup, turn on, connect to the WiThrottle and run a loco than the phone throttle. Finished.....turn it off....set it down.... it is ready to go without having to plug it into be charged. Great job on the software by Peter Akers that makes the throttle possible to build. A link to his GitHub account where you can find the software and more ( HERE ).
.
.
.
.
.
.
.
.
As you can see above you can build a WiTcontroller throttle to suit your needs. It can be as simple as one battery and no additional button switches for functions as you have up to 10 functions that can be assigned to the keypad or add as many function buttons as you want. Peter will be working on the software so that one could have maybe seven buttons and the 10 keypad functions for a total of 15 or more functions that could be used via the keypad and other buttons on the throttle.
You don't need to use my 3D printed case. Make a case from other materials, such as styrene that can be cut, drilled and glued together. Also PeteGSX has a 3D printed case you can download from ( HERE ) and I'll bet more will be coming.
The throttle is evolving and updates can be download fairly easily with a USB cable between the throttle and your computer. There is a lot of flexibility with the throttle as you decide what functions (from those available – Peter's GitHub account ) you want assigned to the keys on the keypad and/or any additional function buttons you add.
To be continued.........and if you came into this build here click ( HERE ) to go to the start of the build....Add
=========================================
...........................On..............e.........Next Page If There Is One