..................................
Return
to Sumner's Home Page....
Return
to N Scale RR Main Menu........ Return
TrackManager Menu
=========================================
..............Previous
Page..............................Next
Page If There Is One
=========================================
.............---
TrackManager Software Prep
---=========================================
On
this page we will go through some software prep before using
EX-Installer to load DCC-EX onto the Nucleo-F439ZI.
Loading
Drivers:
When
using any of the NUCLEO series microcontrollers with Microsoft
Windows, you
will need to install their STLink USB drivers in order to be able to
upload software to them
and
use the Serial
Monitor in either PlatformIO or the Arduino
IDE. This is covered very well on the DCC-EX site down the page a
ways here…..
https://dcc-ex.com/reference/hardware/microcontrollers/stm32-nucleo.html#gsc.tab=0
Upgrade
the debugger firmware:
You
might or might not need to update the firmware on the Nucleo. If you
do that is also covered at the link above.
Adding
Nucleo support to the Arduino IDE:
NOTE:
You need to have Arduino 2.3.4 or newer installed.
If
you don’t have the Arduino IDE (lets users write and upload code to
Arduino boards) you are going to have to download it onto your
computer ( https://www.arduino.cc/en/software
).
Again
this DCC-EX link will walk you through that step…..
https://dcc-ex.com/reference/hardware/microcontrollers/stm32-nucleo.html#gsc.tab=0
With
the Arduino IDE open under tools make sure that you see Board:
“Nucleo-144” & Board Part Number: “Nucleo F439ZI”.
If
you are having a problem finding the ‘Board’ & ‘Board Part
Number’ you might have to delete a cache.
-----------------------------------------------------------------------------------------------------------------
NOTE:
Using the Nucleo with a laptop at the beginning to…...
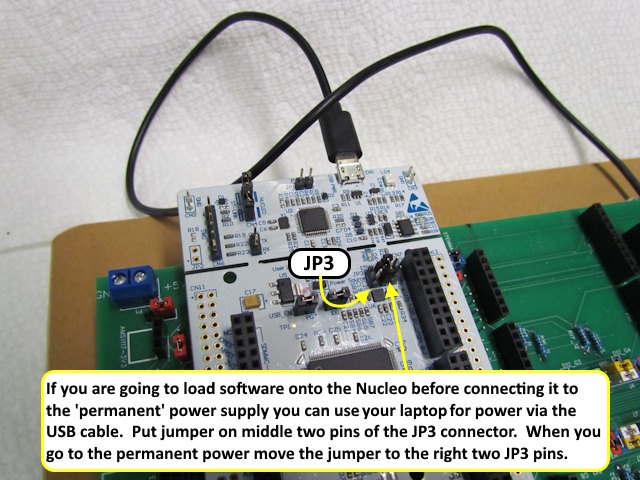
……..
load the DCC-EX command station software before you have the
permanent power supply connected to the Nucleo. To do this you can
use yout laptop or desktop computer. You then need to move the JP3
connector to the middle two pins. Be
sure to move it back to the two right pins when you connect a
permanent power supply up.
You
should now be ready to install DCC-EX on the Nucleo using the
EX-Installer as outlined on the next page.
=========================================
...........................On..............e.........Next
Page If There Is One