.................................. Return to Sumner's Home Page....
Return to N Scale RR Main Menu.............. Return to Locomotive Menu
=========================================
..............Previous Page..............................Next Page If There Is One
=========================================
….........…..--- Pt. 8 --- N Scale DDA35 & B Build ---
=======================================================
NOTE: This is not an accurate build of a DDA35. I've tried to 'get close' but at almost 80 don't want to spend a ton of time on this. I need to get back to laying track, adding scenery and finally running a train or two.
=======================================================
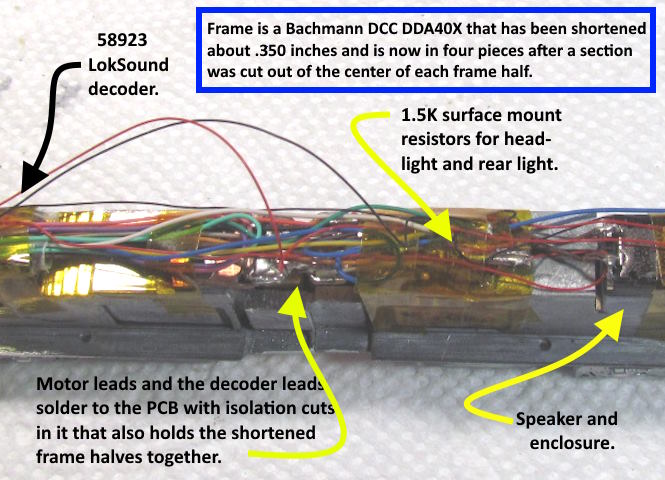
With the Bachmann DCC DDA40X frame shortened .350” and …..
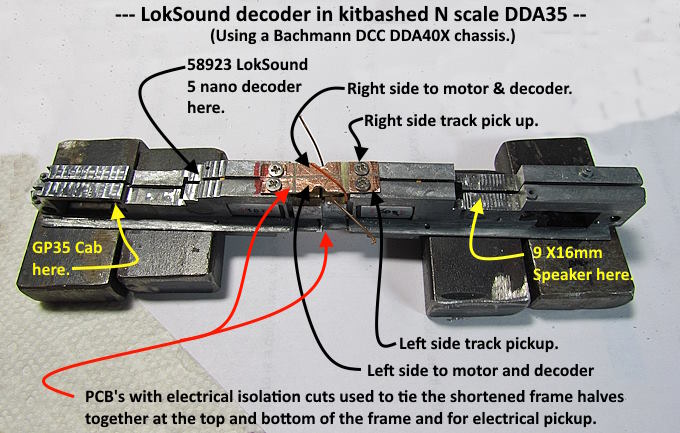
….. the resulting 4 frame pieces held together with pieces of printed circuit board (PCB) top and bottom it is time to install the ESU 58923 LokSound 5 nano DCC decoder in the DDA35.
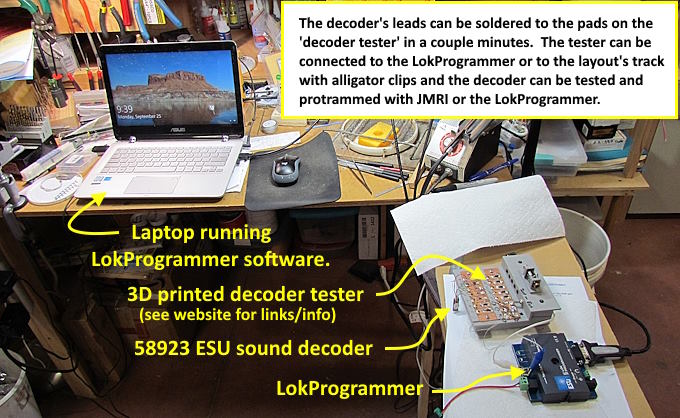
I'm trying to get into the habit of testing the decoders before I install them with the decoder tester I built ( HERE ). I should do this when I get them in case they have to be sent in under warranty actually. I bought the LokSound decoder from SBS with a different sound file but was able to put a DDA35 sound file on that I downloaded from ESU's site. Can't do this without the LokProgrammer piece of hardware shown bottom right above. It isn't cheap but still not that expensive if you are going to install many ESU sound decoders.
Not only can you download the sound file now or later if you want to change it the LokProgrammer makes it easy to change almost anything else you need or want to on the decoder. I'll make some later changes later with JMRI and you can do a lot with it but the LokProgrammer makes complicated changes to the decoder easy and can do some things JMRI's Decoder Pro can't.
Another big change I made to make programming easier was to change the wiring on ( my test track ). It is an oval with some sidings and one of the sidings has been able to be changed from the main to a program track with a DPDT switch. That worked pretty good but for some testing I'd have to lift or run the loco out onto the main for some testing. Now I added another DPDT switch. Throw it one way and program with the LokProgrammer and the other way to program with DecoderPro. Then the other change was the other DPDT switch now makes the 'whole' layout the 'main' or the 'programming' track.
I've used this some and love it. I usually never have a loco on the layout unless I'm programming, testing or working on it so not worried about writing a decoder change to more than one loco at a time. I used it like this recently and it is so much easier to adjust the loco's speed for speed matching. Make a change and run it and time it around the oval till the speed matches what I want with any throttle setting. Also to use the decoder tester I only need to clip the leads on it to the track and I'm in programming mode with either DecoderPro or the LokProgrammer at the flick of a switch and can run the loco immediately. No more messing around on a short section of straight track.
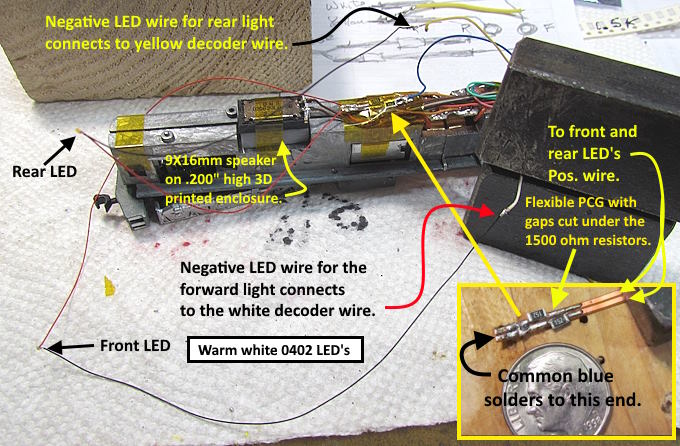
Again, as in some other installs, I used a couple short pieces of flexible printed circuit board (PCB) as a means to add resistors for lighting. They work nice for this and other needs.
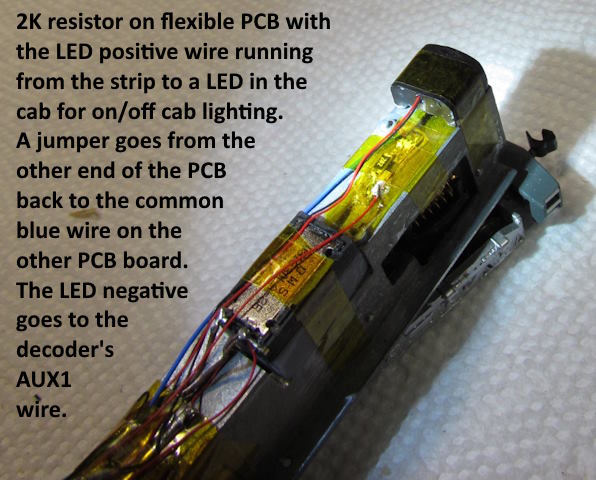
I upped the resistor for the cab light as I want it set to a really low level and might have gone to far (will change it if I have to). You need to use resistors with the ESU decoders for the LED lighting but it is also easy to dim the LED's using DecoderPro or LokProgrammer if needed. You can't make them brighter as the resistor will dictate the maximum brightness. Easy to make them fade in/out or lots of other lighting options (strobe, ditch, etc.).
There are a lot of wires just to the right of the decoder for other functions that I'm not using at this point but might so kept them long as there is room under the shell to do that.
Looks like a lot of wires but a number at the left aren't used at this point and might never be used. With all the frame milling out of the way this was actually one of the fasted decoder installs I've done. Probably less than an hour getting the initial wiring in place (add the cab lighting later).
Ran the loco to try everything out and love how it runs. It runs as good as anything else I have. So smooth. Not sure if it is the 2 motors, the decoder are the combination but love it.
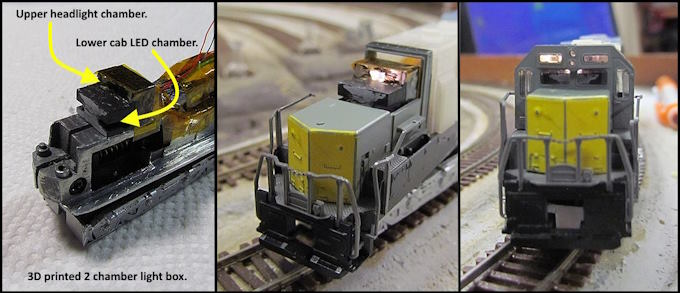
I designed and printed front and rear light boxes to limit where the LED lighting shows.
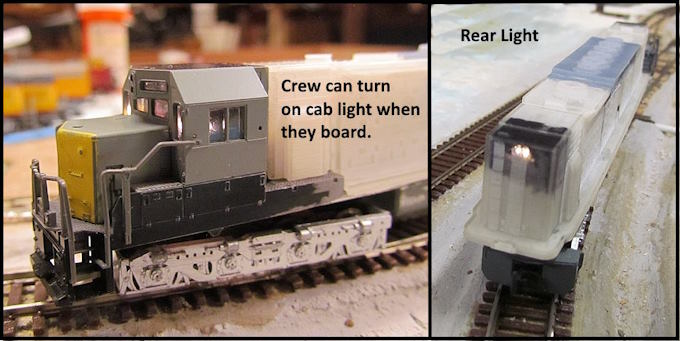
I added the cab light since it was so easy and the crew requested it. It will be out underway and I could toggle that to be automatic If I needed to but for now it is controlled by a function key on the throttle and would probably stay that way even if it automatically is turned off under way.
Click on the image above or ( HERE ) to see and listen to the DDA35.
If you came into the build here you can go to the start of the build ( HERE ).
(NOTE: Keep in mind that this is N scale and these images if viewed on a computer can be larger than the real thing.)
=========================================
…..............................................Next Page If There Is One