.......................................Endeavour Index Page..............Electrical Mods Index Page
....................................................Previous
Page.............................
Next
Page If There Is One
==================================================================
..................--- Helm Navigation Station/Wiring the Helm --
.................................................................................--- Part VI ---
==================================================================
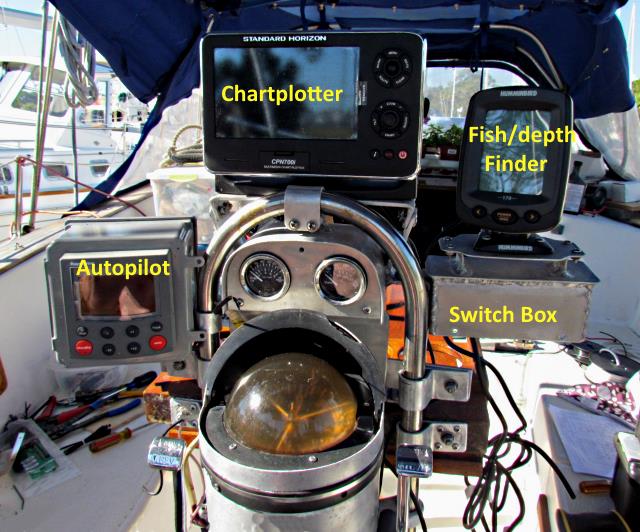
After a lot of work building panels and running wiring it is finally time to actually wire the different instruments at the helm.
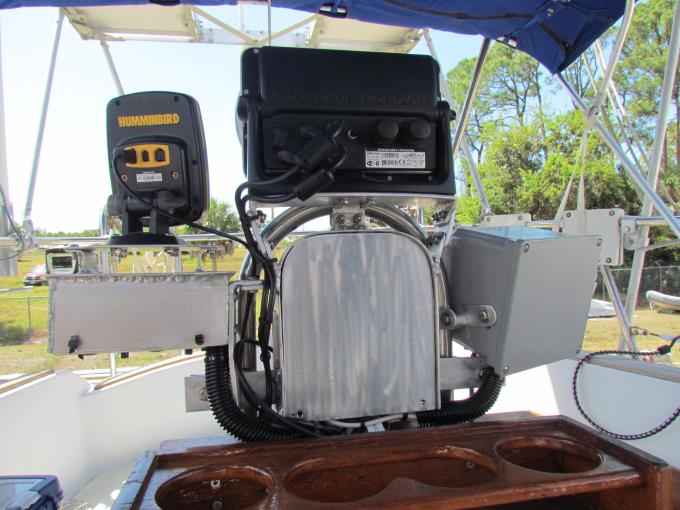
Above you can see that the tabs on the side of the enclosure have been shortened and brackets attached and the whole assembly is now firmly attached to the SS tubing at the helm. Also the bottom terminal has been wired with the 8 conductor, plus ground shield, to the bottom terminal strip. The rest of the wiring shown above all goes to the terminal strip in the quarter berth. There is no wiring at this point to the chartplotter, fish/depth finder and autopilot except for the transducer wiring to the fish/depth finder and the flux compass wiring to the autopilot.
Next came the wiring of the above instruments and the switch box.
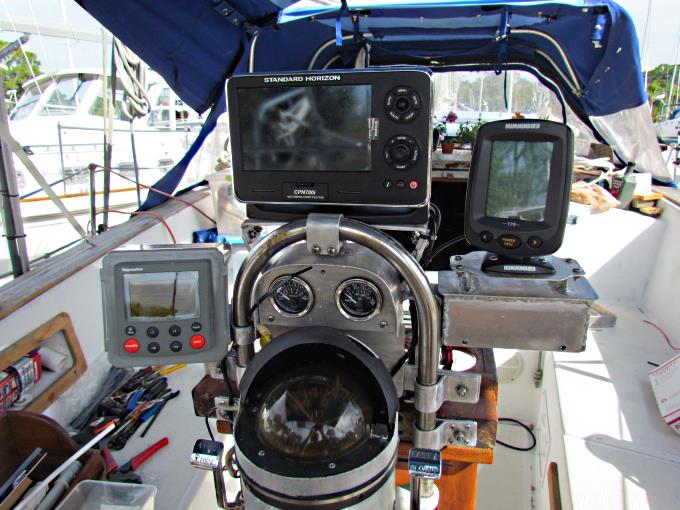
The chartplotter has two cable coming from it that contain the NMEA serial wiring and the power to the chartplotter. At this point they are hanging off to the left. We will order two more of these cable so that we can take the chartplotter home to use on the MacGregor. That way we won't have to disturb the wiring from these cables to the two terminal strips.
The autopilot use to be in a wooden box that always needed refinishing. The plastic electrical box shown above was bought and the back side was cut out for the autopilot and the side in the picture comes off to allow access to the wiring.
Off to the right above you can see the cockpit cooler (needs ice) on the port side. The wiring to the helm goes through one corner of it, but it is still useable. The boat came with the nice cockpit table shown above. It folds down against the helm pedestal when not in use.
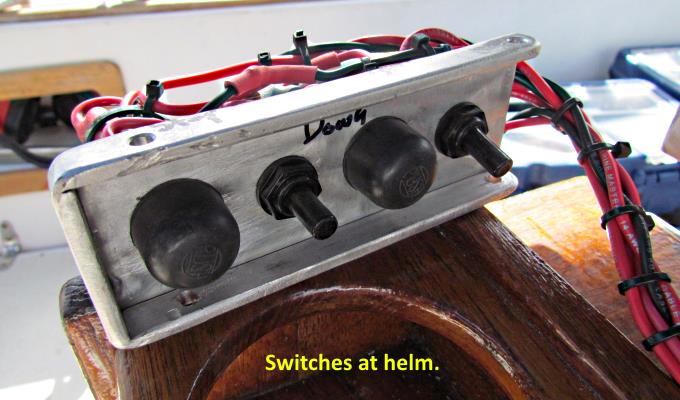
Above the start and stop push-button switches are in place along with the two toggle switches with rubber boots on them.
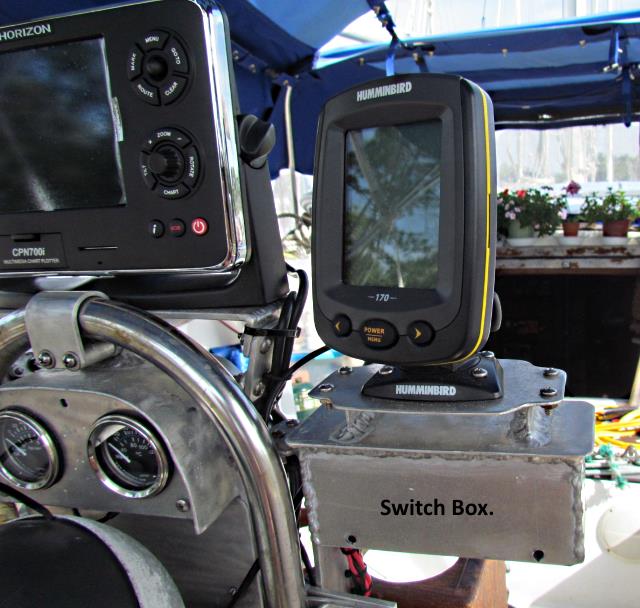
A lot of wiring had to fit into the small box and I wished I would of made it a little larger, but got it all in. The start and stop switches are all sealed.
Rubber boots have been put on the the two toggle switches.
The toggle to the left sends power to the gauges here and also to the gauges at the engine panel at the head of the cockpit if you throw it one way. The center is off and if you throw it the other way it again provides power but also turns the gauge lights on.
Coming from the left side the next switch is the push-button 'start' switch for the Perkins 4-108 diesel.
Next is another toggle that has a center off. Throw it one way and there is power to the chartplotter and fish/depth finder (they can still be turned off by their own on/off switches). Throw the toggle the other way and the chartplotter and fish/depth finder are on, but now the autopilot also has power to it.
The last push-button switch to the right is the off switch for the Perkins diesel and it controls the relay at the quarter berth which then engages the fuel shut-off solenoid on the diesel.
The fish/depth finder mounts on top of the switch box.
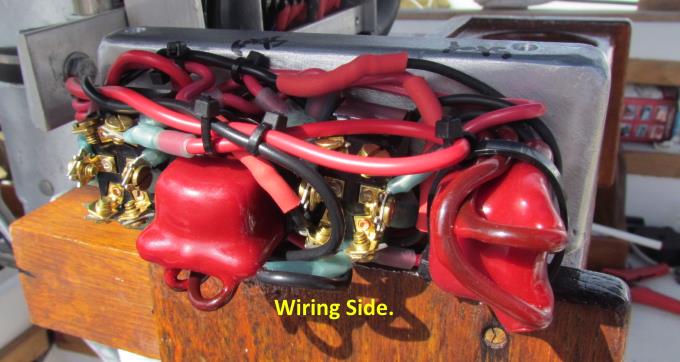
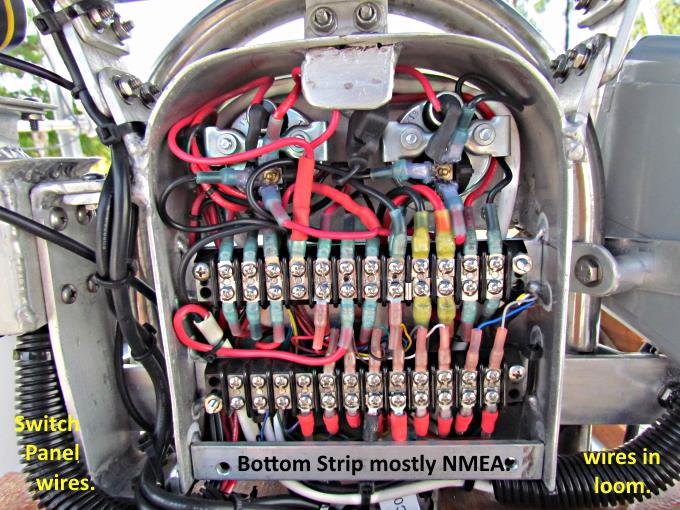
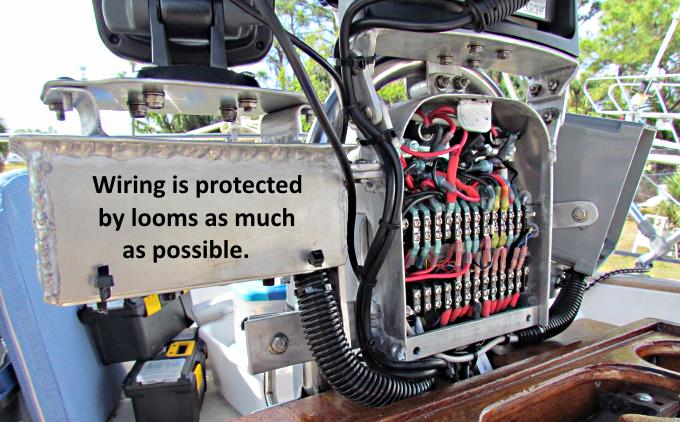
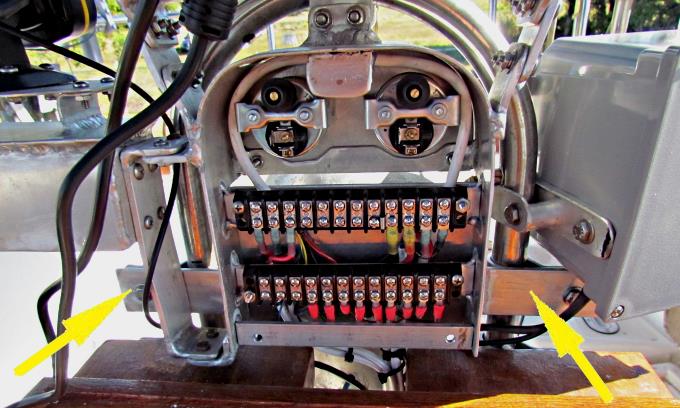
At this point all of the wiring is complete and there again I wish I would of made this enclosure just a bit larger as there is a lot of wiring in it. The wires to the switch box and to the autopilot have been placed in looms. The top terminal strip is mainly wiring for the various instruments and the switch box. The bottom strip is mainly NMEA serial wires going to and from the chartplotter and the AIS radio and the computer at the Nav. Station in the boat at the bottom of the companionway.
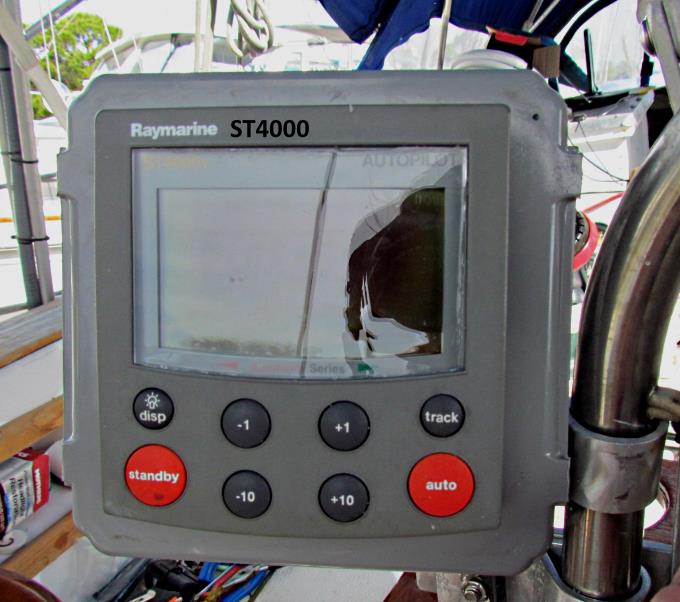
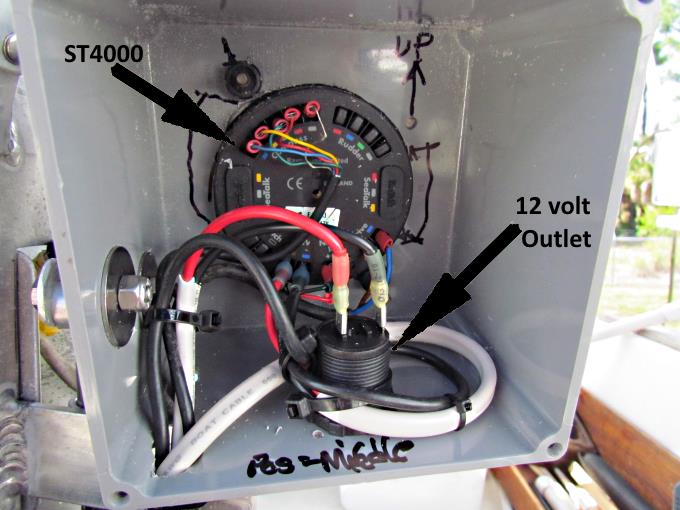
The boat came with the Raymarine ST4000 autopilot and as mentioned further above I mounted it in an electrical box and ....
.... Mounted the box to the SS tubing on the pedestal.
NOTE: We used the autopilot a lot on our spring 2018 Florida trip and our 2019 Bahama trip. The drive belt was rotten so I had to replace it and there is now also a spare in the boat. There are two minor issues with the autopilot. One is that we and the previous owner haven't calibrated it to the bearings on the chartplotter. Not a big deal as we get on the bearing we want either by eye sight or with the chartplotter and then hit 'AUTO' and it stays on that course even though the reading on the face is different from the bearing we are on. The other is that the '-1' button that will turn the boat 1 degree to port doesn't work. We usually push 'Standby' and turn to the new heading and then push 'Auto' to stay on the new course. Another alternative is press the '-10' degree port button and then hit the '+ 1' degree starboard button a couple times to bring it back starboard. All and all it isn't a big deal and we use the autopilot most of the time.
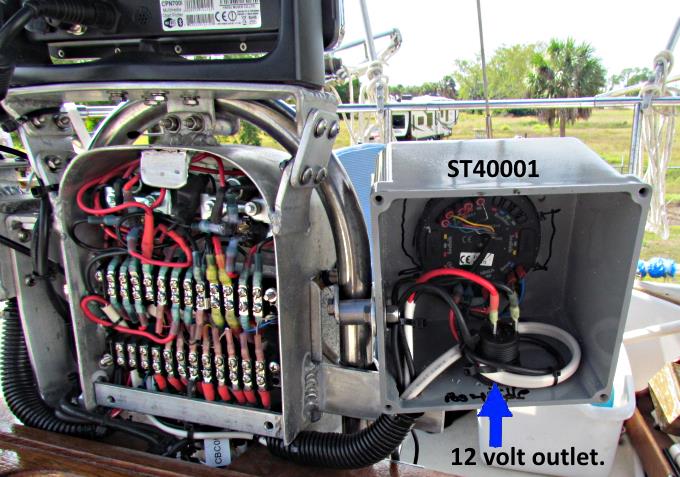
In addition to the wiring going to the autopilot there is also heavier wiring going to a 12 volt outlet that ...
.... is also located in the box.
The opening for the outlet is outside the box on the bottom side.
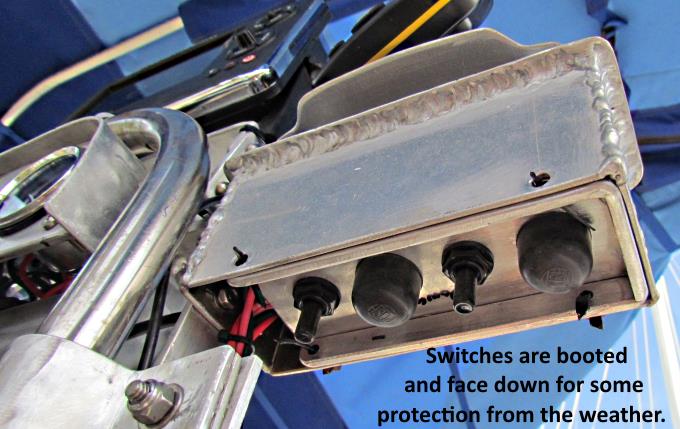
Most of the external wiring is now in looms with the exception of the wiring to the fish/depth finder and the two cables to the chartplotter which are designed to take some weather.
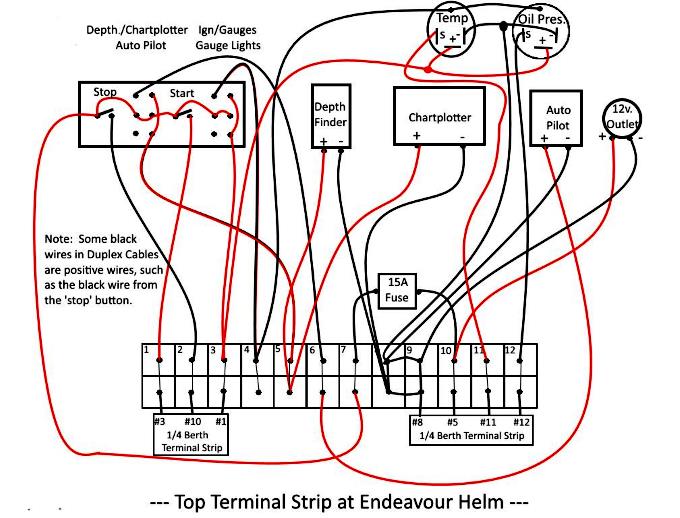
Above is the wiring diagram for the top terminal strip in the enclosure. Most of this wiring is to the switch box and wiring to the individual instruments and to/from the terminal strip in the quarter berth as shown by the two boxes at the bottom of the diagram.
The top terminal strip shown above is in the enclosure and the bottom one is located in the boat at the Navigation Station. the wiring between them is the #20 8 wire signal wire. The chartplotter at the helm will be in communication with the Standard Horizon AIS radio and also a computer running OpenCPN at the Nav. Station in the boat. We will be able to plot courses on the computer if so desired and send the waypoints to the chartplotter at the helm in seconds if so desired. I really like OpenCPN for charting courses and if for some reason the chartplotter at the helm failed we could still use the computer running OpenCPN and connect it to a handheld in the cockpit just as I had been dong for years on the MacGregor.
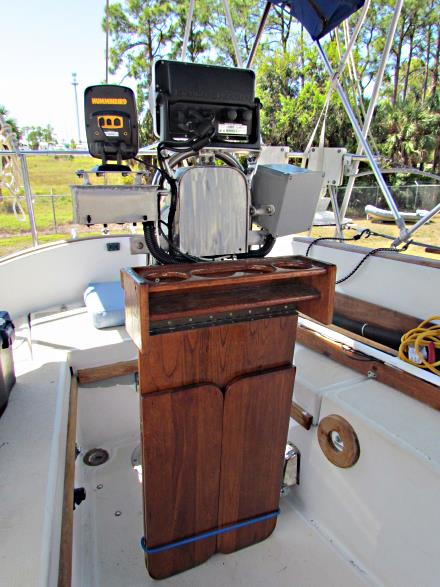
The final install....
.... with the back of the enclosure in place along with the back of the autopilot enclosure in place.
We feel that the boat has a modern functional helm now.
==================================================================
............................................................ Next Page If There Is One