.................................. Return to Sumner's Home Page....
Return to N Scale RR Main Menu........... Return to Building UP's Canyon Division Menu
=========================================
...............Previous Page.............................Next Page If There Is One
=========================================
…..............................--- Sawmill Design Build -- Pt. 1 ---
=========================================
WARNING: The following might contain information that is quite boring for many.
….................................................................................................................................................................................................
I needed to ….
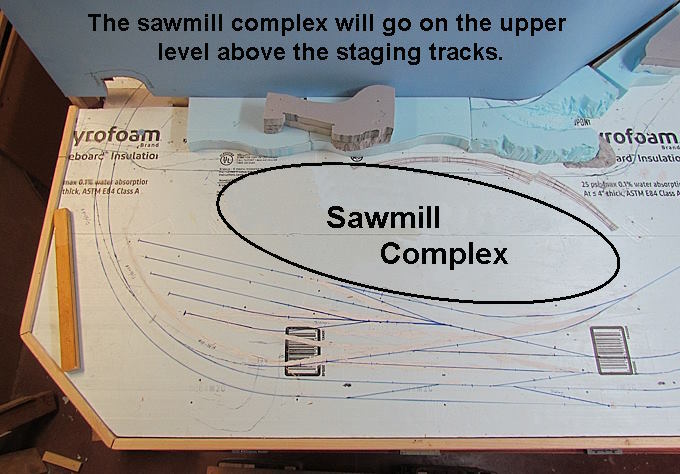
…. get the track roadbed through the tunnel, top left above, and on the other side of the upper level here so I could finish up the scenery on the other side of the backdrop. Doing that I ended up wanting to lay all of the cork on this side while I was at it. To do that I wanted to make sure the track where some of the sawmill's output would be loaded was in the right spot and that a sawmill would actually fit in this area.
While researching sawmill ideas …
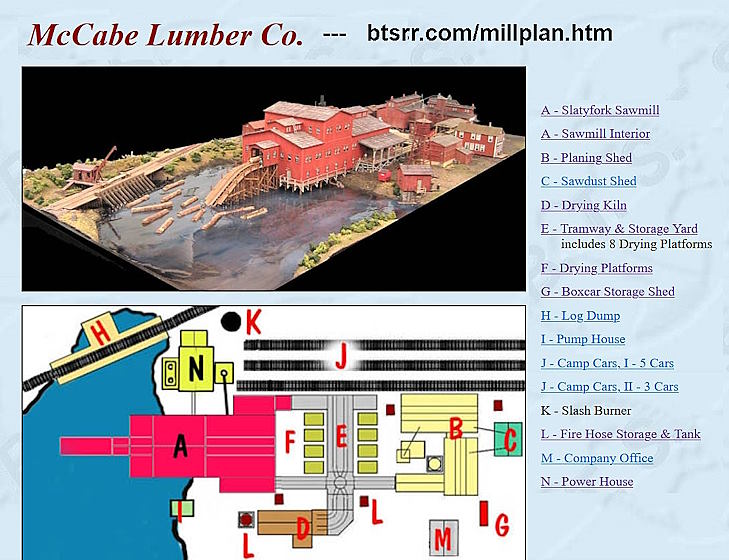
…. I came across the B.T.S.'s Sawmill kit that is available in HO, S and O gauges. It is an unbelievable kit and if you are in one of those gauges and looking for a sawmill or sawmill complex be sure and take a look at their offering ( HERE ). Great detail, both inside and out, with lots of options one can choose from.
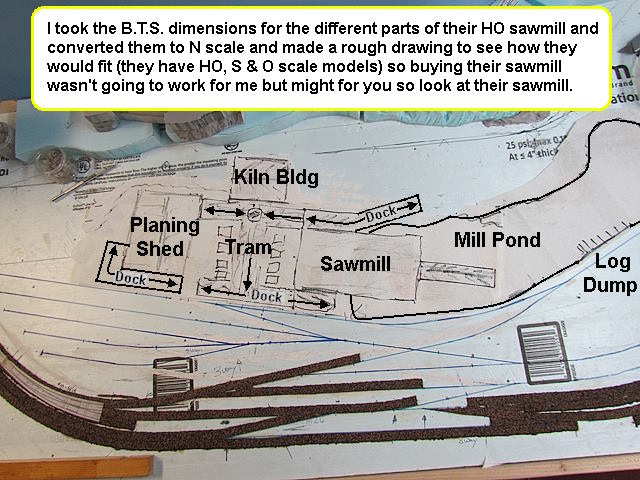
I did use there HO dimensions and sketched out their sawmill complex on some paper towels to see if it might work in N scale. My conclusion was that even though I liked their concept for a sawmill complex it was tool large to work for me in the space I had, especially since I also need to have room for lumber stacks for air drying. My plan is that the mill has a kiln and would kiln dry some of the lumber but not all of it. Some would be rough cut (I used that for posts/beams in our house) and some would be finished like the aspen that our interior walls are covered with.
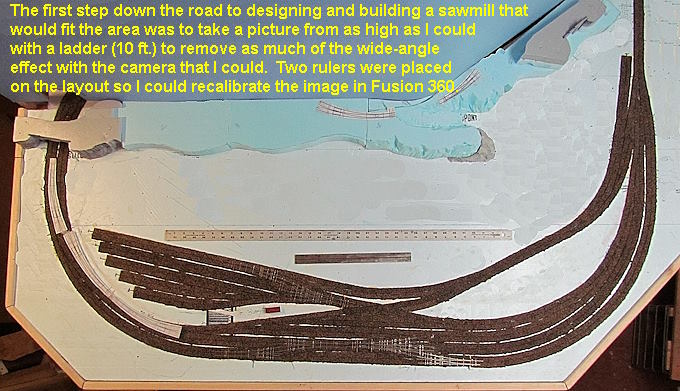
To design this with Fusion 360 I needed an accurate image of the upper level that I could then design on. This way I would make sure that the sawmill design I came up with would fit in the space available.
I have 10 foot ceilings in the shop so got up on a ladder and took a couple shots. The high shot directly from above would avoid some of the wide-angle problems I'd get from shooting down closer to the layout. I took the shot, several, and then cropped the image to the area I wanted to work with.
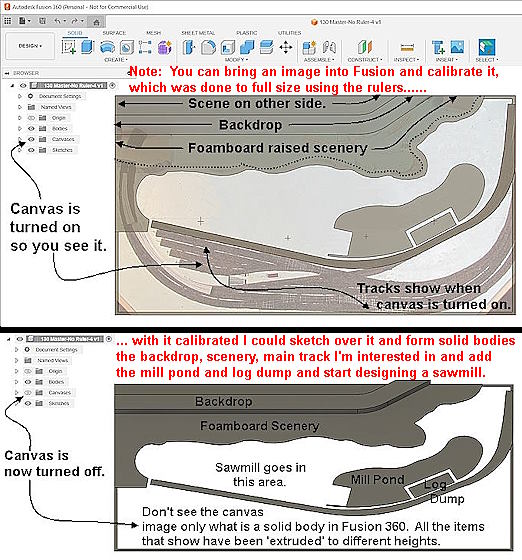
I laid a 3 foot and 1 foot ruler on the layout so that I could calibrate the image in Fusion 360 to full size.
It is easy to bring an image into Fusion 360 and calibrate it to whatever scale you need. I calibrated the image full size in Fusion using the rulers. At the top of the image above I have the calibrated image showing as the background. I can then draw/design right on it and make the different areas (backdrop, foam board scenery and the one track I wanted 'solid objects'. This goes quick and once I have them designed the image/canvas can be toggled on or off at any time (bottom of the image above).
This is a great tool that I've use before. If you aren't commercial it is great to have a program this powerful available for free.
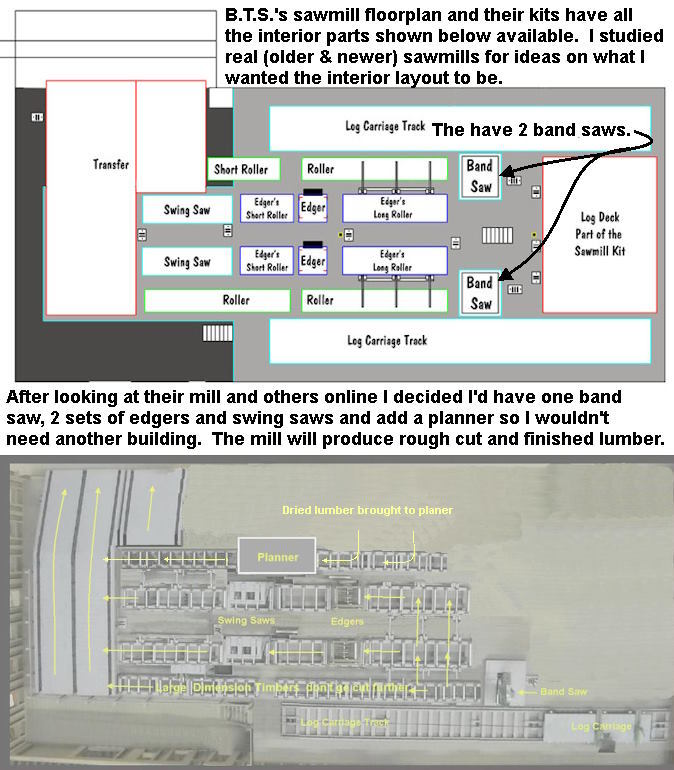
B.T.S. Has some great interior equipment that you can buy for HO, S & O scales. If you want to populate the interior you can buy the band saw, edgers and swing saws they make along with some other items (again if you are in those scales check out the saw mill and other items they have ( HERE ).
Their saw mill is configured for two band saws and a set of edgers and swing saws as shown above. Their layout is similar to how saw mills have operated for some time. The equipment now is pretty much laser/computer controlled and doesn't require near the man power as it use to.
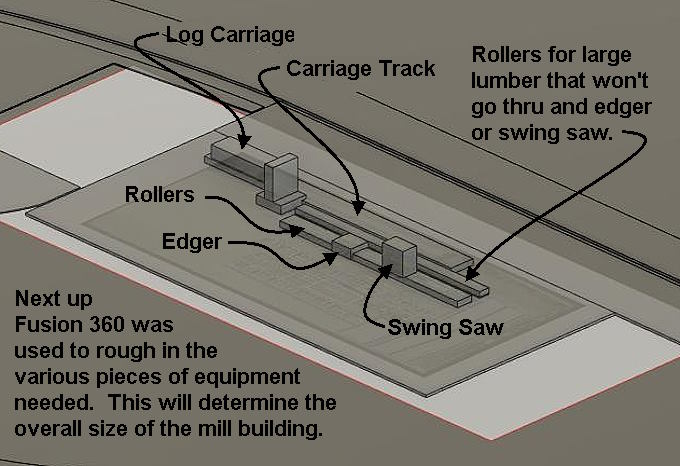
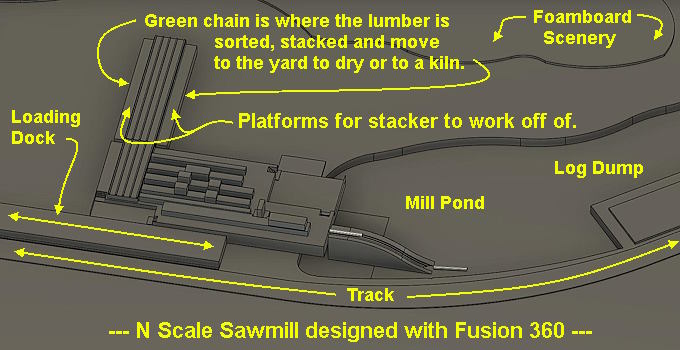
I decide to copy some of what they are doing but not all. I went from two band saws to one. Kept the layout of having 2 edgers and 2 swing saws. I'm setting it up so that lumber could come off the band saw and move to rollers next to the saw and onto the green chain which moves the lumber out of the main part of the mill. This would be the larger pieces like posts and beams that wouldn't go through an edger.
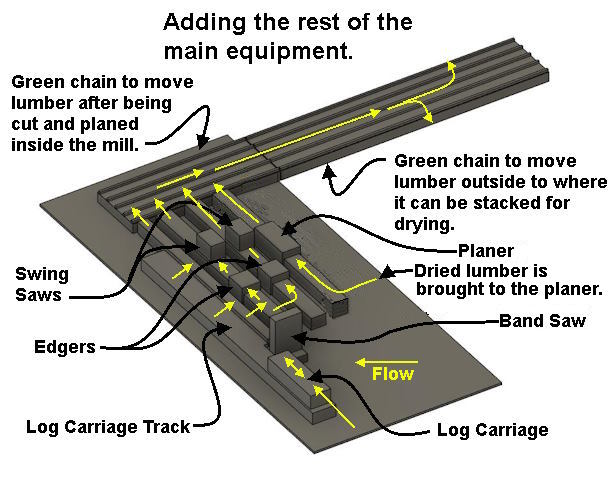
If the lumber moved past the first set of roller it could go to the first set of an edger and a swing saw and move through them to the green chain. This would be rough cut (non-planed) lumber. The lumber could move past that to the second set of an edger and a swing saw.
There is also a planer but before lumber would go through it the green lumber would move to the green chain and out of the mill. There it would be stacked and either air or kiln dried. After it is dried it would come back to the mill and put on a dock just outside where the planner is. Then it could be planed and go back on the green chain (now dried and planed) and moved by the chain outside and sorted and stacked as dried planed lumber.
The large beams and posts that moved along the first set of rollers could go out a side door of the mill on that side to be loaded into boxcars or onto the green chain and to the yard to dry or be hauled off with a semi (how some of the lumber output will be transported).
Using Fusion rollers, edgers, swing saws were roughed in along with the band saw, log carriage and carriage track. I set up the roller lengths and other items where the mill could produce lumber up to 16 ft. long. Longer lumber could be cut it it didn't go through an edger or swing saw.
Not sure I'll ever make the interior equipment or not. Laying it out gives me the option that I could if I wanted and that the mill would be the right size to accommodate it.
I continued on mocking in the rest of the equipment and set up a single green chain that takes the lumber outside the mill proper to where it can be sorted off the green chain and put into stacks that can be moved into the yard for air drying or to a kiln if the lumber is going to be kiln dried.
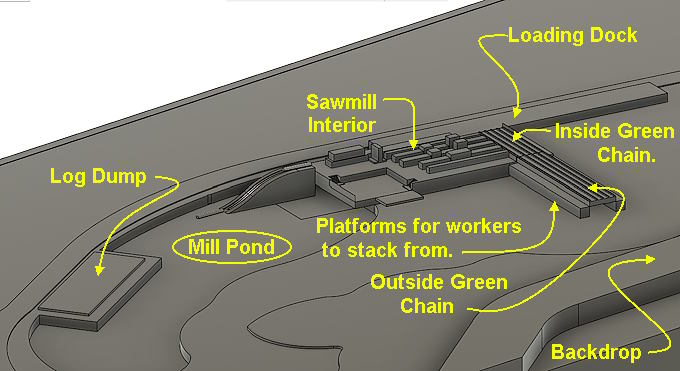
Above is hopefully how the sawmill will be laid out. Time period is early'60's and this sawmill probably wouldn't of lasted as is much longer but some did like the Hull-Oakes Lumber Mill that is still in operation and was still partially run by steam until 2013. I'm actually going to use the Hull-Oakes as a model to some extent. I'm not trying to model it but use it for ideas. At the bottom of this page I'll put some links to Hull-Oakes as it is a great resource.
Logs will come in by rail and logging trucks and lumber will go out the same way. I'll probably add a kiln so that some of the finished lumber can be kiln dried.
A tour of Hull-Oakes ( HERE ).
A lot of pictures (new and historical) ( HERE ).
Also the mill shipped by rail also until I believe 2007 and there is a four part YouTube Series on that ( HERE ) by Ken Olsen who also created a small model railroad and Inglenook puzzle that goes to train shows based on the switching that goes on at the mill ( HERE ).
To be continued...........
A link to this whole build ( HERE ).
=========================================
...........................On..............e.........Next Page If There Is One