.................................. Return to Sumner's Home Page....
Return to N Scale RR Main Menu........ Return to DCC++ Menu
=========================================
..............Previous Page..............................Next Page If There Is One
=========================================
…..............................................--- DCC-EX Install that includes WiFi ---
--- See how inexpensive, easy, quick it is to have a DCC Command Station ---
=========================================
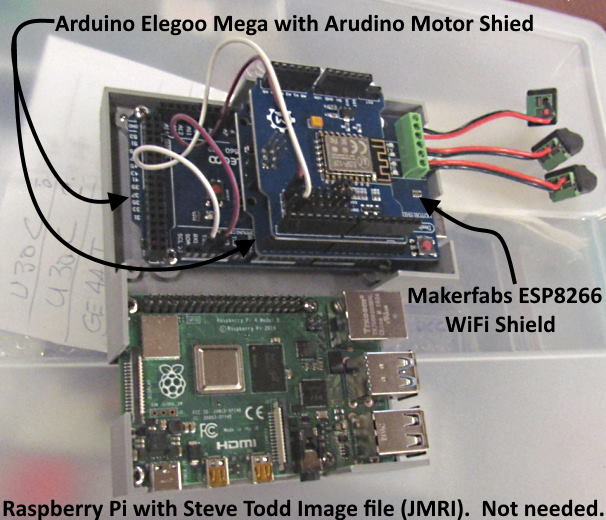
The following will show you how easy and quick it is to build a DCC-EX Command Station, oh yes, also very inexpensive. I show a Raspberry PI that is in the same case with the Arduino Mega Command Station. You don't need it. You can use any computer you have to put the software/sketch on the Arduino.
It is easy to also use the same computer connected to the Mega for programming with JMRI's DecoderPro. JMRI also gives you the option to run a phone throttle if it is connected to a WiFi network. I like the Pi as it also creates a WiFi network that can be used but you could also use your home's WiFi network and this Command Station also creates a WiFi hot-spot that you can connect to with your phone throttle.
Enough talk, let's build the Command Station. Take your time with the steps below, one at a time, and in an hour you will have a DCC-EX Command Station.
Step 1:
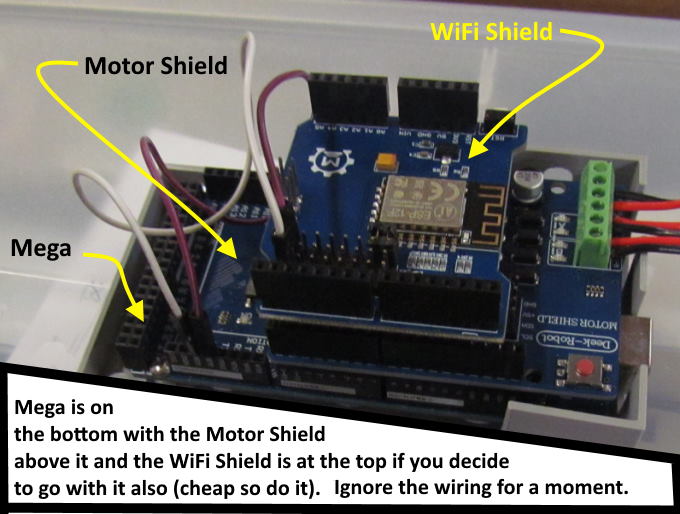
You need an Arduino Mega or a clone like the Elegoo Mega that I'm using here. You need a motor shield on the top of the Mega. It will take power from an inexpensive power supply and supply that power to the Program and Main tracks. Then optional, but why not, you need a WiFi shield that goes on top of the motor shield. By adding WiFi you have the option to not have a computer connected at all. Once the Mega is turned on the Command Station supplies current to the two tracks and the included WiFi lets you connect EngineDriver to the Command Station via your Android phone. You can then control trains and turn the track power on off.
This also lets you take a smaller layout to say a show and you can run trains and it will produce the WiFi connection for a phone throttle.
You can find a parts list option for the parts you need on the DCC-EX website ( HERE) and also at the bottom of this page.
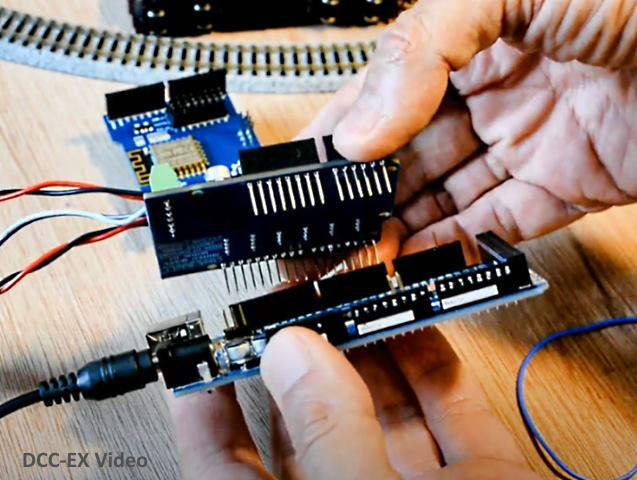
Take a few minutes and watch the DCC-EX Video above or ( HERE ) and It will make the following steps easier.
You will start with connecting the Arduino Motor Shield board to the Mega. Then the WiFi Board (if used) on top the Motor Shield as shown above. This might look a little intimidating but you are only taking one board and plugging the male pins from it into the board below. Take a couple minutes to make sure the pins are straight, line them up so the pin-out text on one board lines up with the board below it and press them together.
If you would like to see more pictures on connecting the boards go ( HERE ) on the DCC-EX web site for more info.
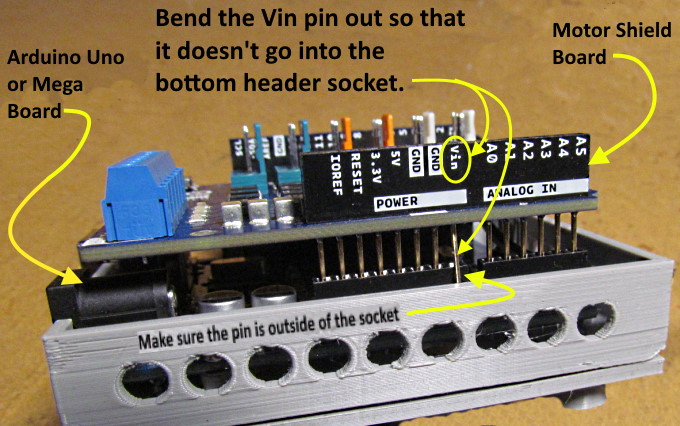
First though you need to intentionally bend one pin out on the Motor Shield so that it does not go into the Mega as shown above. There are a couple other option vs. bending the pin out ( HERE ) but I think that this is the easiest.
After you have the Motor Shield plugged into the Mega do the same for the WiFi Shield if you are going to use it.
(Note: The WiFi board uses the 5v pin to the motor shield for power. If you are going to plug another board into the WiFi board (unlikely) and need the Vin power above the WiFi board cut the trace on the motor shield and don't bend the Vin pin out. This won't apply to probably 99% of the people who build the Command Station.)
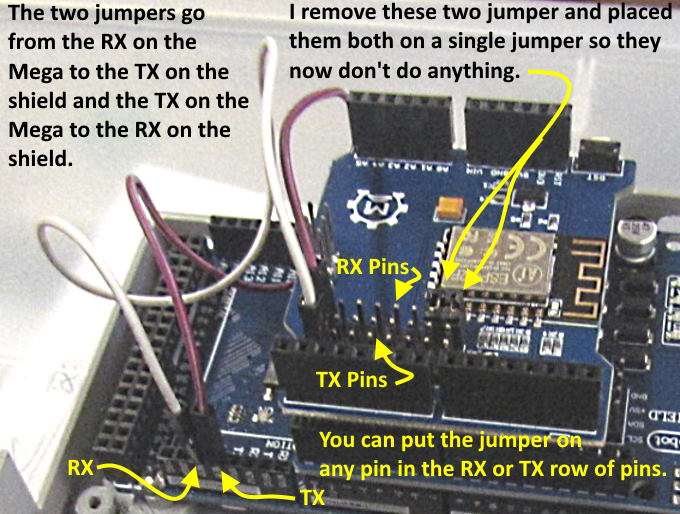
I realize that some get concerned when they see an image like what is shown above. Don't let it concern you. It is only a matter of plugging the Motor Shield into the Mega and the WiFi shield into the Motor Shield and adding the two jumpers that also plug into both boards. Next image is what I use for the jumpers. Follow the image above to install them and that is it for the wiring except for the wiring out to the track and in from the power supply.
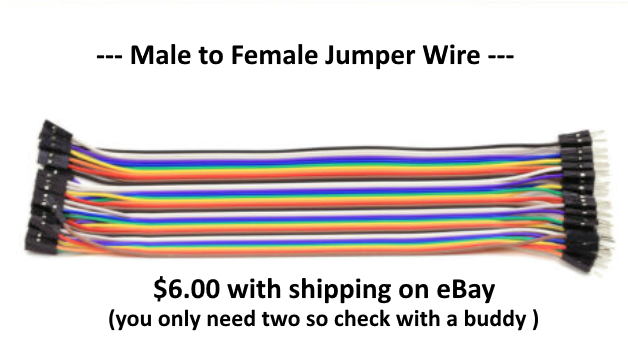
For the jumper wires I like the ones above that you can find on eBay ( HERE ) or Amazon ( HERE ). You only need two so check with that buddy of yours that is into electronics. You could also make up the two jumpers from bare wire.
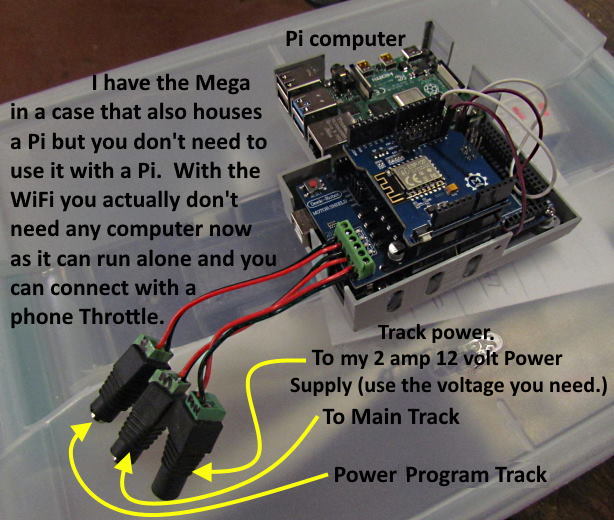
You will wire the power into the Motor Shield and two sets of wires will come from the Motor Shield to the Program Track and the Main Tracks. Almost exactly what you would do with any other Command Station. Not show is also a wire into the Mega (under $10 9v power supply) and a USB Cable from the computer if you are using one also to the Mega (these are standard off-the-shelf cables).
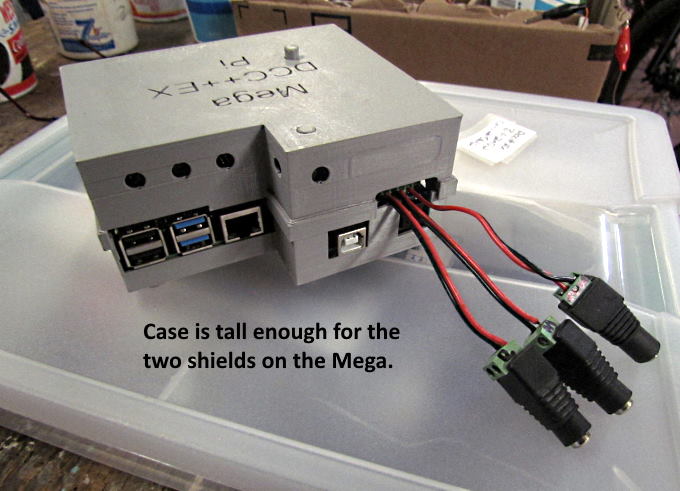
You can mount the Mega on about anything or you can find print files for cases ( HERE on my site ) or....
you can find cases on the Internet if you want one.
So step one above will probably take you less than ½ hour to complete
Step 2:
In this step we will load the DCC-EX software/sketch on the Mega. This turns the Mega into a DCC Command Station. One really nice thing about DCC-EX is that as they come out with improvements and add-ons you can spend 15 minutes or less with this step to download DCC-EX again onto the Mega with the current version.
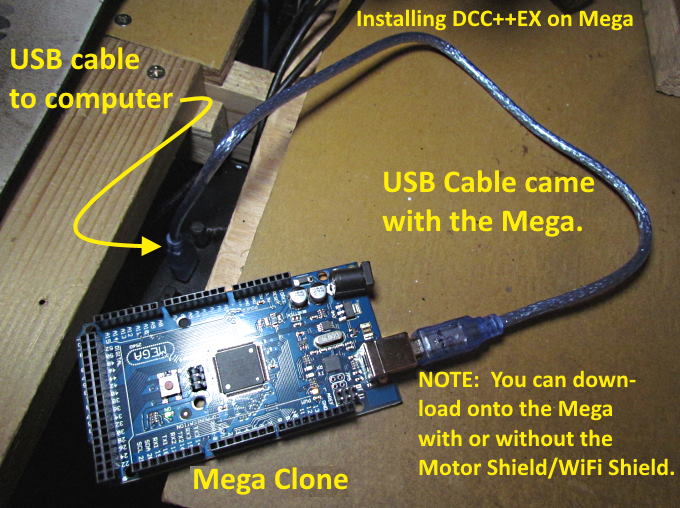
Connect the Arduino Mega to your computer ….
…. with a USB cable (these usually come with the Mega).
Go to DCC++ EX ( HERE ) and download the 'Automated' installer program. It will appear in your 'Downloads' folder. Unzip it into a folder just under C:/ as follows:
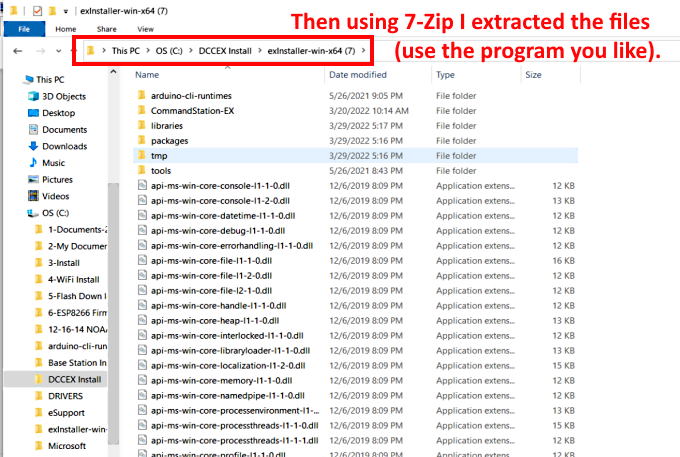
I use the free 7-Zip program to extract files but there are a number of options. Might even be one on your computer now.
After the files are extract (just a couple seconds) …...
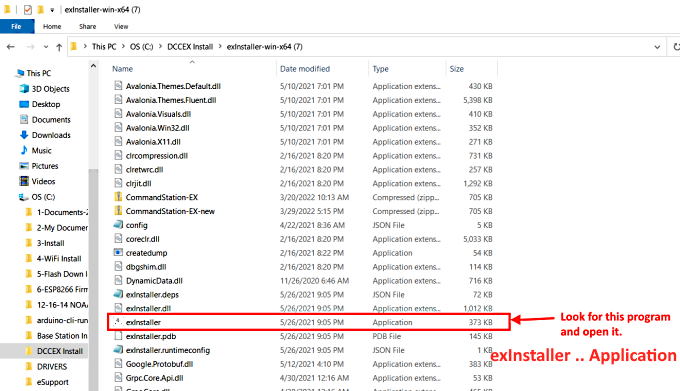
….. open exInstaller (Automated Installer Program) and ….
….. the screen above should show up. Follow the instructions from there and in a few minutes or so it will finish putting DCC-EX on the Mega and that was it. No software programming or anything else that is hard to do. One big plus is that you can come back and do this again any time the guys at DCC-EX have added new features to the software. If you are having any problems you can ‘open a ticket’ for help on the DCC-EX Discord channel ( HERE ). There is pretty much 24/7 help there.
Step 3:
Lets get this connected to the layout and run trains. If you didn't put the WiFi board or even if you did you need to connect a computer to the Mega with a USB cable and also a 9v power supply to the Mega and an appropriate power supply to the Motor shield on the Mega (I use a 12v – 2 amp for my N scale layout go higher voltage for other scales). This is all straight forward and the two power supplies should cost your under $20-$30 together.
At this point besides the connection from a power supply to the Motor Shield you should have the Program and Main tracks connected also to the Motor Shield (see the picture further up this page).
Step 4:
Options to run trains. You can use one or the other of these two options or both together.
If you don't have the WiFi shield installed you need to connect to JMRI (free and load it onto the computer connected to the Mega). You run JMRI's WiThrottle through a WiFi hot-spot. Either your house's WiFi or in the case where you are running a Raspberry Pi you can use the WiFi hot-spot it creates. See JMRI's instructions for this.
If you have a Pi you can download Steve Todd's image file onto a micro SD card and plug it into the Pi. Once the Pi is powered up it will start and automatically load JMRI along with WiThrottle and you are done and ready to connect your phone throttle.
The second option if you have the WiFi shield on the Mega is the ability to connect without a computer attached to the Mega (although you can do both). Now when the Mega is powered up it will start and become a DCC Command Station and also a WiFi Hot-spot. With an Android phone and the EngineDriver app loaded onto it you can open EngineDriver and it should see any WiFi networks that are available.
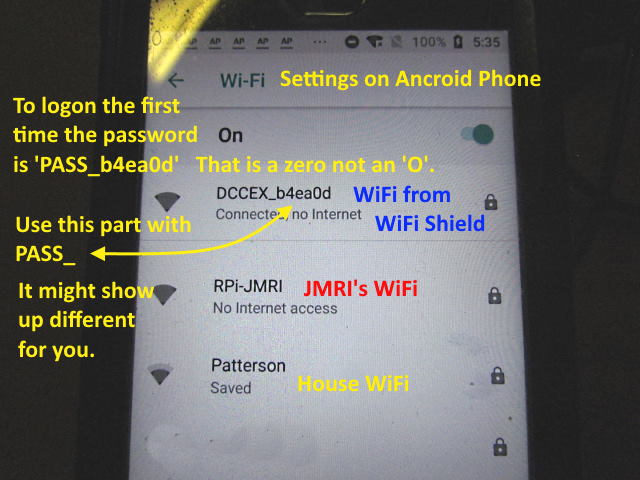
First though go to settings on your phone (see above) and connect to the network you are going to use. Either the one JMRI is using or if you have the WiFi shield you should see a network like in the image above (the one created by the WiFi shield). The first time you connect to it you will need the password. It will be PASS-xxxxxx wher the xxxxxx is the 6 letters/number to the right of 'DCCEX_'. You might see a different 6 characters for your network. Use whatever they are and not the ones I've shown. You shouldn't need the password on subsequent connections to the network.
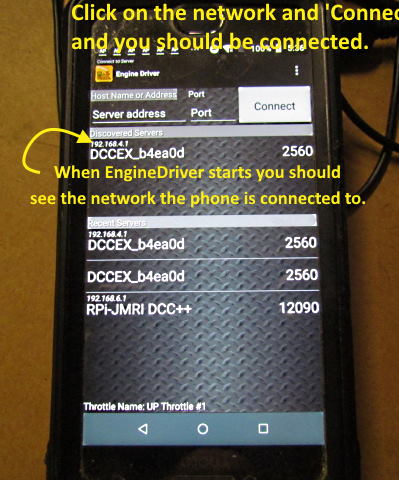
Open the EngineDriver App and you should see a screen like the one above. It sees that the phone is connected to DCCEX_b4ea0d which is the network that has been created by the WiFi board on top of the Mega. Click on the network and then 'Connect' and you should see a screen like the following one.
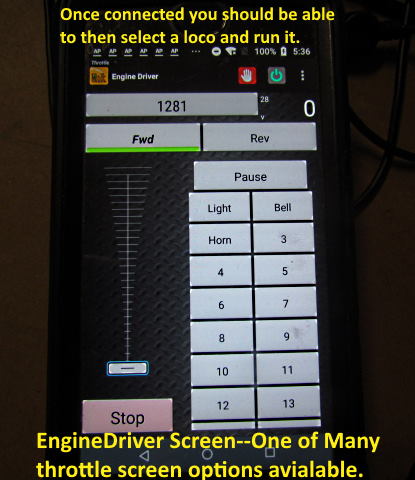
As soon as EngineDriver connects you should see a screen where you select the loco you want to control. EngineDriver has many screen options and you can see up to 4 throttles at a time if your screen is big enough or have the options to toggle through them.
Instead of connecting to the WiFi shield on the Mega you could connect the phone to the JMRI network if you have one setup.
So in about an hours time you have a DCC-EX Command Station up and running. Not much more difficult than connecting to a commercial one and you will have spent less than $100 doing .
=======================================================================
--- DCC-EX Command Station with WiFi for Phone Throttles for under $100.00 ---
Parts List (as of 03-31-22 – Do some searching and you can find these items for $20-$30 less):
Arduino Mega ….................................................................................................... $24.00 .. ( Amazon HERE )
Arduino Motor Shield............................................................................................ $25.00 .. ( Amazon HERE )
Makerfabs WiFi Shield.......................................................................................... $15.00 .. ( Makerfabs HERE includes shipping )
Power Supply for Mega ….................................................................................... $10.00 .. ( Amazon HERE )
Power Supply for Motor Shield (track Power)--( More options HERE ):
12v 2 amp ( N Scale although some use a higher voltage) …...................…... $10.00 ( Amazon HERE )
14v 3 amp ( HO and other larger scales) ............................................................ $15.00 ( Amazon HERE )
…..............................................................Total ….. $84.00 ( 12 volt) ….... $89.00 (14 volt)
=========================================
...........................On..............e.........Next Page If There Is One