...............................................Our MacGregor Index Page..
..Our MacGregor Index Page...........................Next Page If There Is One
|
.......... --- Electric Propulsion For The Mac --- ..............................................--- The Plan --- |
Let me start by saying the following mod is maybe for no one else but something I wanted to experiment with and try out and there is no way that I could probably justify this to anyone maybe even myself.
Ruth and I had used the Mac for some long trips. Not necessarily long in distance but in time with the longest being almost 8 weeks and about 400 miles. I hope to maybe do even longer trips. The 180 watts of solar was 'about' adequte for the fridge a lot of computer time and a CPAP machine at night. Still had to run the 12 volt gen-set about 3-4 hours on that long trip. That was total run time so not bad. After the last trip I upped that to 200 watts but never got to use that. With the above in mind I wanted a little more solar if possible since if I'm out 2-4 months I'd like electricity just like you would like it if you were living at home.
Then I also got to thinking wouldn't it be nice to have electric propulsion at times. Maybe getting on and off anchor or to a dock or on that day there is no wind and the water is like glass, or motoring down the ICW or the Erie or Trent-Severn Canals (which I hope to possibly do). Well if I was going to take this step to electric propulsion I'd need even more solar or at least run the gen-set more and that was just going from one gas engine to another.
Before I forget I have no intention of not still using the 9.8 HP Tohatsu a good part of the time. This exercise is just for situations that allow it. I also realize that what you are going to see below will look like a lot of added weight but the 6 panels, frames, supports and such probably adds about 120 lbs. to the boat at the most. The 2 additional batteries does add their weight also. I'm strickly a cruiser so this doesn't bother me at all. I want the boat to be capable of selfcontained long cruises, that is the only goal I have. In my case looks go out the window and don't concern me. Functionality is number 1 for me and chances are I'll be cruising alone or at the most with one other person on board so less weight there.
I started at looking at how much solat I might need and where I could possibly mount panels to do it.
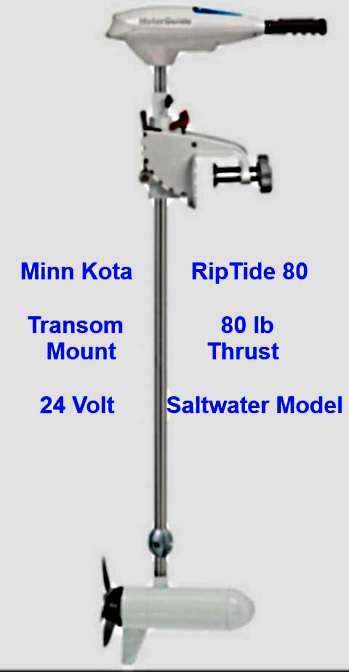
For the propulsion I narrowed it down to the Minn Kota Riptide 80 above. Mainly because it was salt water rated and had a resonable price tag on it and .....
....also they recommended a 24 volt or 36 volt motor over the 12 volts ones in their lineup if you wanted a more effecient motor. The 36 volt was going to cause some charging problems with what I had in mind for panels so I narrowed it down to the 24 volt model which also puts out 80# of thrust which is more than the 12 volt models. According to them and others the varible speed models along with the higher voltage made for more effecient operation. I talked to one of their techs and he felt that running at a low amperage (low motor speed) of 10 amps or so it might be resonable to expect 2-3 knots with the displacement hull. That sounded good to me as 2-3 knots for 6 hours a day could give me 12 to 18 miles of travel and that was about what I'd like to do between anchorages.
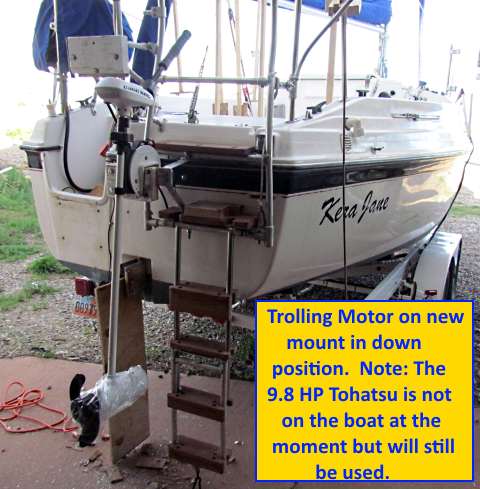
So I bought the trolling motor and made a mount for it off the back of the transom. It will just clear the rudder but due to the handle hitting the ladder it won't turn much but I figure I can use the rudder for that.
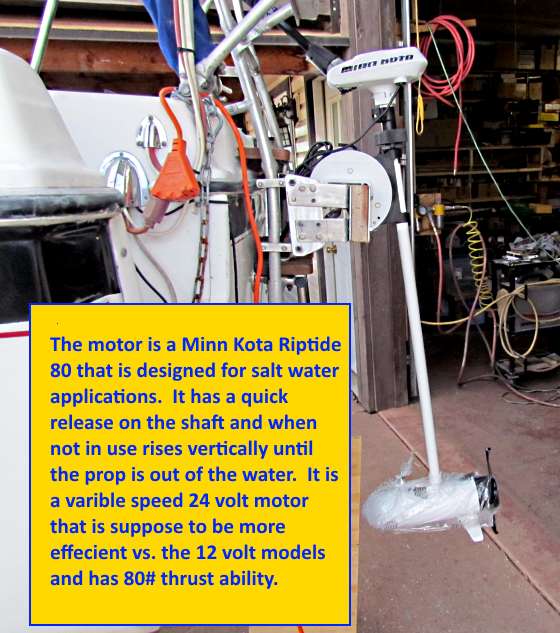
Designing the mount so that the motor would clear the rudder and still not obstruct the ladder use, either as a ladder or as a tow bar for the dinghy, reqired some thought but I finally came up with a solution I'm happy with at least for now. I can't turn the motor much but it is easy to reach the handle to control speed and direction while seated in the cockpit. The motor has a quick release cam that lets you easily raise it straight up to get it out of the water when it isn't needed. It also can tilt but not that way I have it mounted due to the ladder rungs which I'm not removing. I'll post more about the motor mount on a different page hopefully.
So the motor is mounted and the next item was building a battery box....
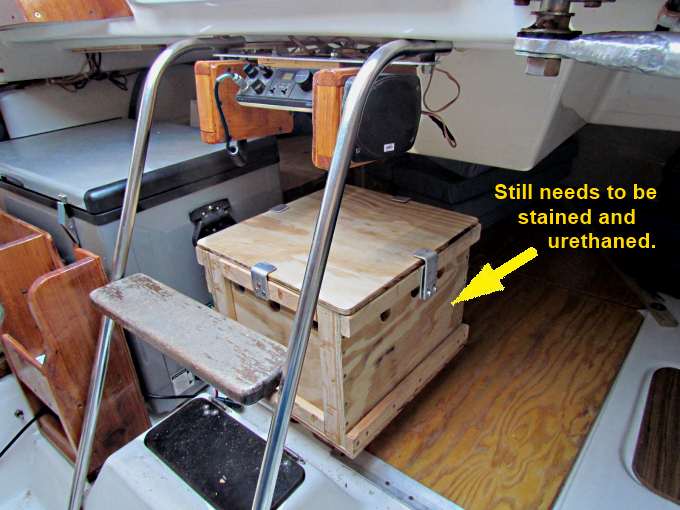
... that could hold two 12 volt marine deep cycle batteries in series to provide the 24 volts for the motor. Since I only use the rear berth for storage I put the box there behind and under the companionway. I wanted to keep it forward weight wise and also so I could check and maintain the water levels in the batteries easier. I did all of this work in Blanding, UT (home) before taking the boat to Florida. I left items like staining the box and the wiring for all of this for when I arrived in Florida (at the time I'm writing this page I'm still home).
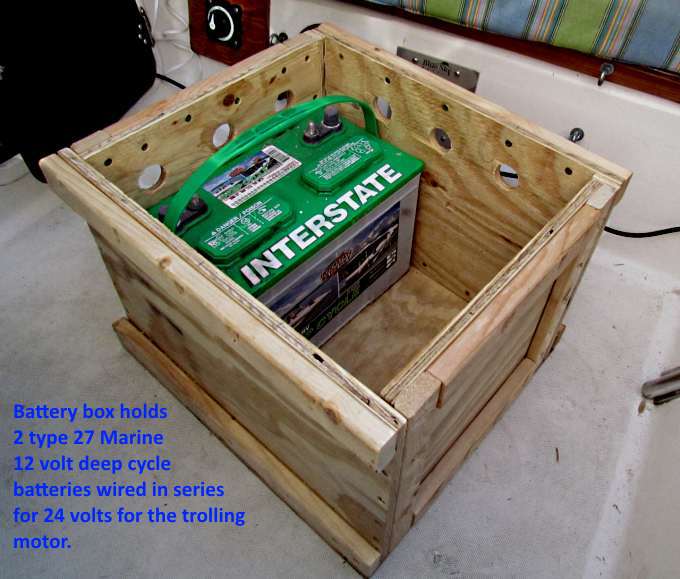
As you can see above the box will hold 2 group 27 batteries. I wanted those over group 24's since they are larger in capacity and not that much larger in size.
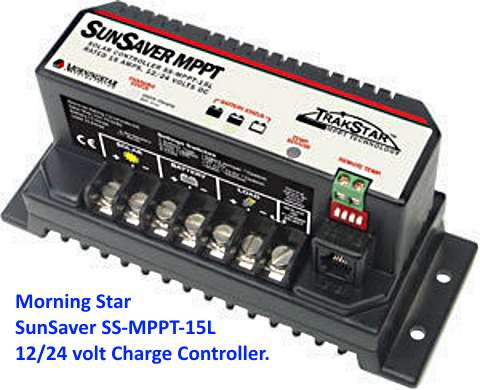
I also bought the MPPT charger above as it will work in either a 12 volt system (charging 12 volt batteries) on in a 24 volts system like I had. The MPPT costs more than a PWM controller but is also somewhat more effecient and I needed all of that I could get. This will also get wired in when the boat gets to Florida.
So the last part of the puzzle was the panels, what size physically, what size in watts and where and how to mount them. I decided on six 60 watt panels for a number of reasons. Having more gave me the option of various positions where they could be mounted. I could run/wire/switch them between charging 12 volt batteries or pairing them up in series to charge my pair of batteries that were wired as 24 volts.
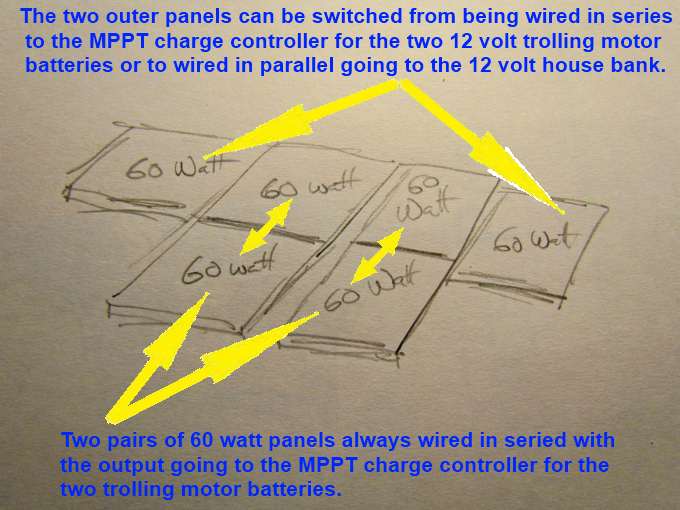
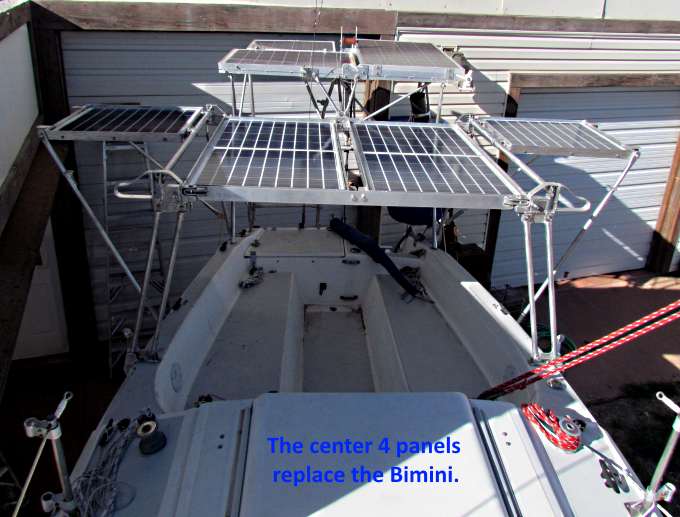
I decided that 4 would be mounted over the cockpit where the Bimini had been mounted and that 2 would be mounted outboard over the sides of the boat. The two outer ones could be used either to charge the 12 volt house bank switched to it as individual panels or with the switch thrown they would be wired in series and could charge the 24 volt trolling motor bank.
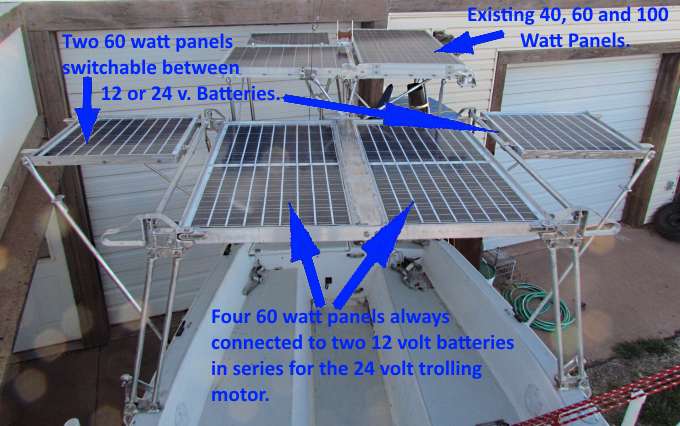
Above you can see the mounts I came up with and these and all the brackets and supports and frames and such constitute a large number of peices of alumium that had to be cut, machined and welded together as individual units that could then be bolted or pinned together as a very flexible use support for the 6 panels. I spent about 50-60 4-7 hour days making all of this and would not want to do it again.
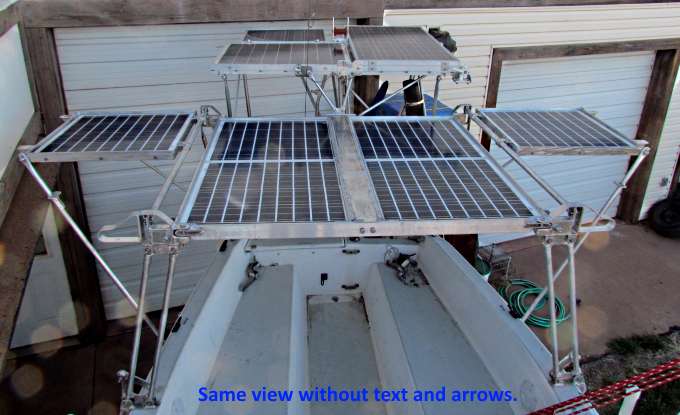
Above all of the panels are situated in a 'working' mode (all deployed). I decided on the outers to also use in an auxiliary use to charge the 12 volt house bank since if I'm sailing chances are the boom and the sails will probably be shading the 4 inner panels and they won't put out much. If I'm using the trolling motor I'm hoping to then have the sail down and the boom pulled to one side or the other so the panels get the most sun that is avialable.
Now I had to make other options for how the panels could be positioned since there would be times the outer ones weren't needed or would hit say a piling or I couldn't trailer with them out there. The same with the inner 4. I might want to sail with nothing over my head or not want them there during boat setup when I'm raising the mast.
So next we will explore all of the postions the panels can be placed in for different needs. The 3 panels above the stern (200 watts total) never move and always are connected to the house bank primarily. I will also have them switchable to the charge the 24 volt battery bank if I need to do that and I don't need the output for the house bank. I won't be able to charge the 24 volt bank with the 12 volt house solar panels and also use the trolling motor at the same time so it will be one or the other.
If I'm just using the 360 watts coming from the 6 new panels I can charge and use the trolling motor at the same time. If they are putting out enough for the motor speed setting then I'll be running on just the solar panels. If the motor needs more than their output then the batteries will still get a charge but might be in a slight discharge state but still I could run much longer like this vs. if I was just running on the batteries with no solar input and would then have find a way to recharge them. Worst case here is I might have to use the trolling motor somewhat less and then use part of the day just for charging. It is going to be interesting to see how this all plays out and I'll document that and post about it later after actual use. Right now it is just a big guessing game with a bunch of unknow variables ;-).
So let's go thought the positiong of the panels that are available and you can go from any one of these scenerios to another in less than a minute as the supports and panel frames are hinged and pinned.
Above is full output and full sun protection as in it would be like having the Bimini deployed.
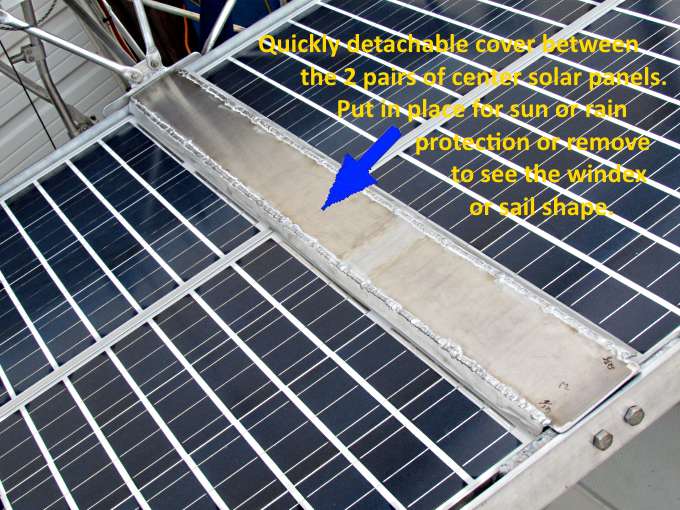
There is a panel that can go over the slot between the 4 center panels. This would be for sun are rain protection if needed. It can be place in position or removed very quickly.
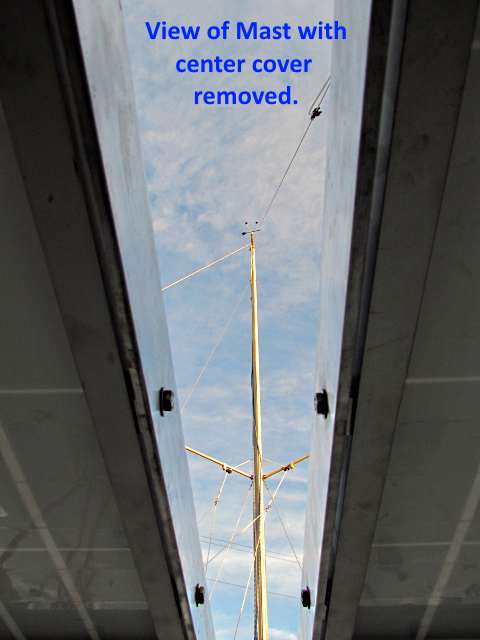
With the panel removed you have a good view of the windex at the top of the mast and you could also see the sail shape.
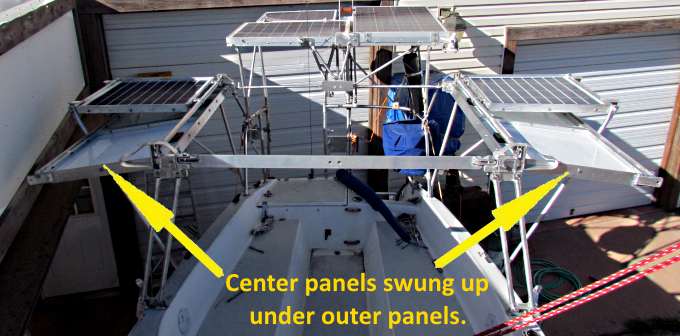
So we are sailing along and don't want the panels over our head but would still like some solar output for either the house bank or the trolling motor battery bank. We pull 4 center pins and the center panels swing down and out and up under the outer panels. The outer panels are held in position with an aft and forward diagonal supports that also are pinned into location on the panel frame and to the boat. One diagonal will easily hold them up as they are only about 15 lbs. each. I un-pin the front diagonal and let it swing out. This allows the larger panel to swing up under the outer one. Then the diagonal is pulled back in and pinned to the side of the boat. It has a small platform on it that now holds the larger panel up and in postion. Now the diagonal is holding one end of the small panel and all of the larger one but only one side of it. The larger panels, two 60 watt panels and the frame, weigh just under 30 lbs.. Since one side is support you are only having to push up less than 15 lbs. and that is all the diagonal has to support also.
In this mode I don't have anything overhead and good side vision out of the cockpit. The front, high, crossmember can stay in postion if I feel that it is needed for the water conditions or un-pinned (one pin on each side) and stored.
In this mode if I direct the output from the 2 outer panels to the house bank I now have 320 watts of solar charging it or could send the 120 watts total output from the 2 panels to the 24 volt bank if that is where it would do more good.
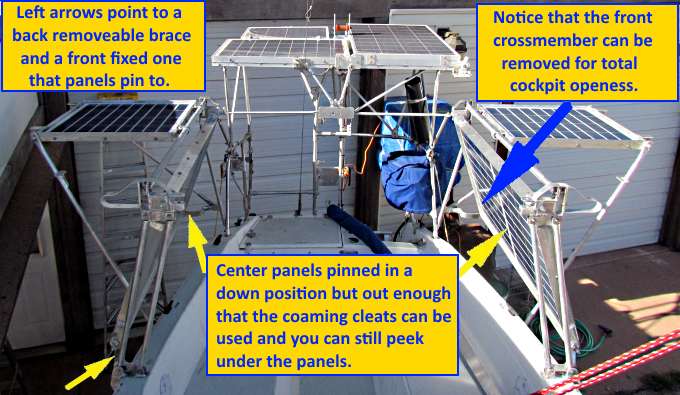
Let's say I'd like some side shade on one side or the other. In that case one or both of the large panels can be swung down and pinned in position just above and outside the cockpit coaming. This restricts side vision but you could still peek under them easily if you are in an area with little other boat traffic. If there was traffic I would choose not to have them down, either up and out or overhead.
Panels can be in any position on either side without regard to what is happening on the other side.
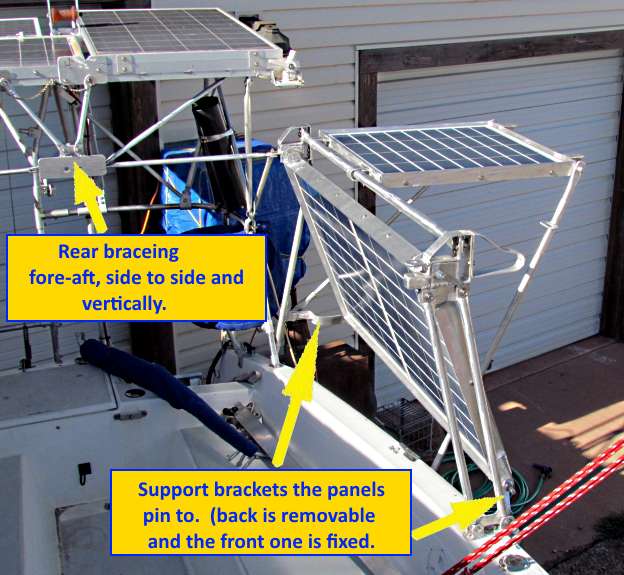
Above we can see the permanent rear bracing that is not in the way there and also the side support brackets used with the panels in this position. These brackets quickly pin to the main supports and panel frames or are stored.

If I don't want the outer panels up then they can swing down and rest against the larger frames. Also the front crossmember can be removed or left in place as shown. In this mode the panels are out far enough you can look under them if needed and easily use the cleats on the coaming tops. If the boat is going into be docked where there are pilings or on the trailer and you want the panels down and not overhead they need to come in a little further.
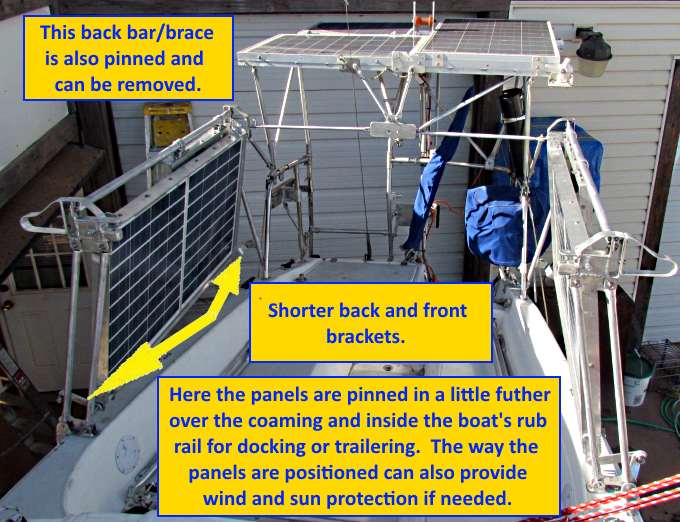
Above they are shown in further and pinned with a different set of brackets to hold them there. I'm going to try trailering in this mod and with all the panels overhead and see if I prefer one over the other. This will be the position they will be in during boat setup although then they can just hang straight down and don't even need to be pinned (can just swing in the down postion). Moving I want them stabilize though.

The last option that can be used on the water or on the trailer is to flop the outer panels over on top of the inner ones. The tabs on the smaller panels and the frames on the larger ones allow this to happen with no direct panel contact. The frames around the panels strengthen them and are higher than the panels for some protection. The panels also set up in them about 1/2 inch on the bottoms so that the frames are the highest and lowest spot around the panel perimeters.
On the following pages when I get the time I'll document making all of the pieces that make up all of the above and there are a lot of them. For example, those corner pieces above (just above and to the left of the 'yellow' box) are made up of over 15 individual pieces that were cut, machined and welded to gether.
![]()
................................................................ Next Page If There Is One