.................................. Return to Sumner's Home Page....
Return to N Scale RR Main Menu........... Return to Building UP's Canyon Division Menu
=========================================
...............Previous Page.............................Next Page If There Is One
=========================================
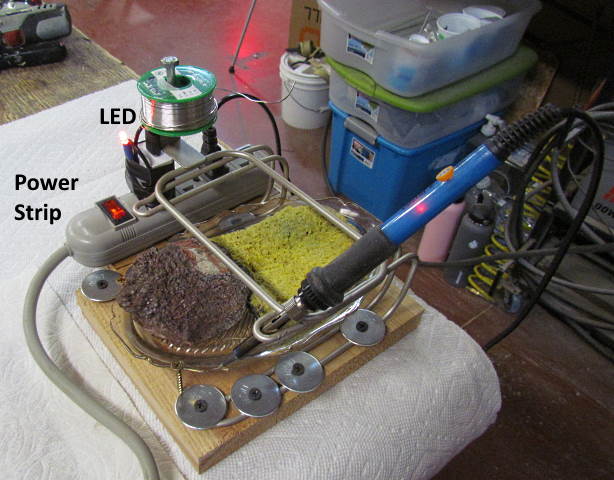
…............................................--- Soldering Track Drops ---
=========================================
With the track down for the sawmill scene area it was time to do a lot of wiring. There are track drops from all sections of track since I don't solder the rail joiners between the turnout ends and the ME code 55 flex track. With 17 turnouts in this area that meant a lot of wires running to them, to the frog polarity servo bracket limit switches and to the flex track between the turnouts (over 40 track drops).
I drill holes just big enough for the 22 awg solid wire I use. Then from the wire spool I run wire down through the hole. Reach under and pull it to the side of the layout where it will later be soldered to the buss. Cut the wire off, pull it out from the hole a bit, bend it over and strip about 1/2" of the insulation off.
I pull it out further and put a short 90 degree bend in the end and bend it back so that it will contact the side of the rail easily. I hold the wire to the rail and put a small drop of Superior #30 liquid flux on the wire/rail joint. The flux is crucial as the solder will flow very quickly onto the wire/rail joint when the soldering the joint. This is not an acid flux and doesn't have to be cleaned afterwards but if you are using one that does need to be cleaned be sure and do that. I love this flux and use it for all my electrical projects. A little hard to find but do a Google search.
In the next step I'll solder the wire to the rail but first. Between almost every solder joint I make, here or on other projects, I clean the iron right before it. I dip the hot iron in one of the small tins of tip cleaner (not shown above) and then wipe it on the wet sponge. The tip should then be shiny silver. It is isn't you are going to have a hard time soldering. Again, I do this for every solder joint just before using the iron. It is a lot of quick cleaning but pays off in easy soldering. I've tried other tip cleaning methods but the sponge still works best for me.
Also I have more expensive irons but these are only $15 on the internet and work great and extra tips are really cheap and quick to replace. Once you can't get solder to stick to your iron change to a new tip. I use a 100 watt iron for these track drops so that I'm on and off in a second or less which then doesn't melt the ties unless you touch them (which I do occasionally). I use a 60 watt for all my other projects. I keep both irons on 'full' hot so that the solder joint time is very short. This keeps the ties or other components from overheating.
I'm using .8mm rosin core solder for the drops and .6mm rosin core for everything else.
With the wire pre-bent and the flux on the wire and rail and a clean iron with a small drop of solder on the tip the soldering will happen in one to two seconds. Hold the wire on the rail. Touch the iron tip to the end of the solder for just a touch of solder. Push the tip with the drop of solder on the tip against the wire/rail and the solder should flow almost instantly. As soon as you see it flow pull the iron away. No melted tie unless you touched.
With an iron at a lower temperature you will be on the joint a longer time and the heat will transfer to the tie.
If you want to solder to the bottom of the rail you could do that also. Slightly different steps. I have too much to do to take that approach and with a drop of paint on the solder joint I can't imagine very many visitors ever seeing the drops. They are too busy looking at everything else. At least that seems to be the case so far.
Above you can see half the drops in the sawmill scene. These go to solder pads ......
..... on one side of the layout with another set of solder pads on the other side. The outside main track here is in a different power district that the majority of the track in the scene. Since ......
...... a DCC-EX Command Station can put out DC and DCC to different districts (8 in my case) at the same time I'll be able to run a DC loco on the outer main track and one or more DCC locos in the rest of the scene at the same time.
I didn't go with buss wires...
.... like I did on the lower level (above and HERE ) as the fascia isn't wide enough on the upper level here so that there is good access to the hidden staging below. The solder pads work well as I can connect a lot of wires together and the DCC from the command station in a very small area.
To be continued and a link to this whole build ( HERE ).
=========================================
..………………………......Next Page If There Is One